

Skip to what pisses you off:
- The Real Deal: Why This Game Might Make You Throw Your Controller
- Why You're Getting Wrecked (And It's Not Your Fault)
- First Steps: What I Wish Someone Had Yelled At Me Before I Started
- Expert Tips & Tricks From Someone Who's Been Stuck For Hours
- Common Mistakes That Got Me Killed (Don't Make Them)
- FAQ: The Stuff The Tutorial Doesn't Tell You
The Real Deal: Why This Game Might Make You Throw Your Controller
Look, I'm going to be straight with you. Black Myth: Wukong is gorgeous. I mean, ridiculously gorgeous. The first time you step into that bamboo forest and see the light filtering through the leaves, you'll think you're watching a movie. But here's the thing nobody tells you in the trailers: this game punishes you for being flashy. It rewards patience and punishes panic. It's not a button-masher. It's not a Souls-like in the traditional sense—it has its own rhythm, and if you try to play it like Elden Ring or Sekiro, you're going to get your monkey ass handed to you.
What makes it special? The combat has this weird, floaty-but-precise quality. You can dodge through almost everything, but the timing is tighter than a drum. The spell system is insane once you figure it out. The bosses are some of the most creative I've seen in years—one minute you're fighting a giant wolf with a sword, the next you're trading blows with a celestial bureaucrat who throws scrolls at you. It's wild.
What's annoying? The checkpoint system is brutal. There's no fast travel between shrines for the first third of the game. Some enemy hitboxes are absolute bullshit—I've been hit by attacks that clearly missed me by a foot. And the game will happily let you wander into an area where you're way underleveled and get wrecked without any warning. That's not a bug; it's a feature, apparently.
Why You're Getting Wrecked (And It's Not Your Fault)
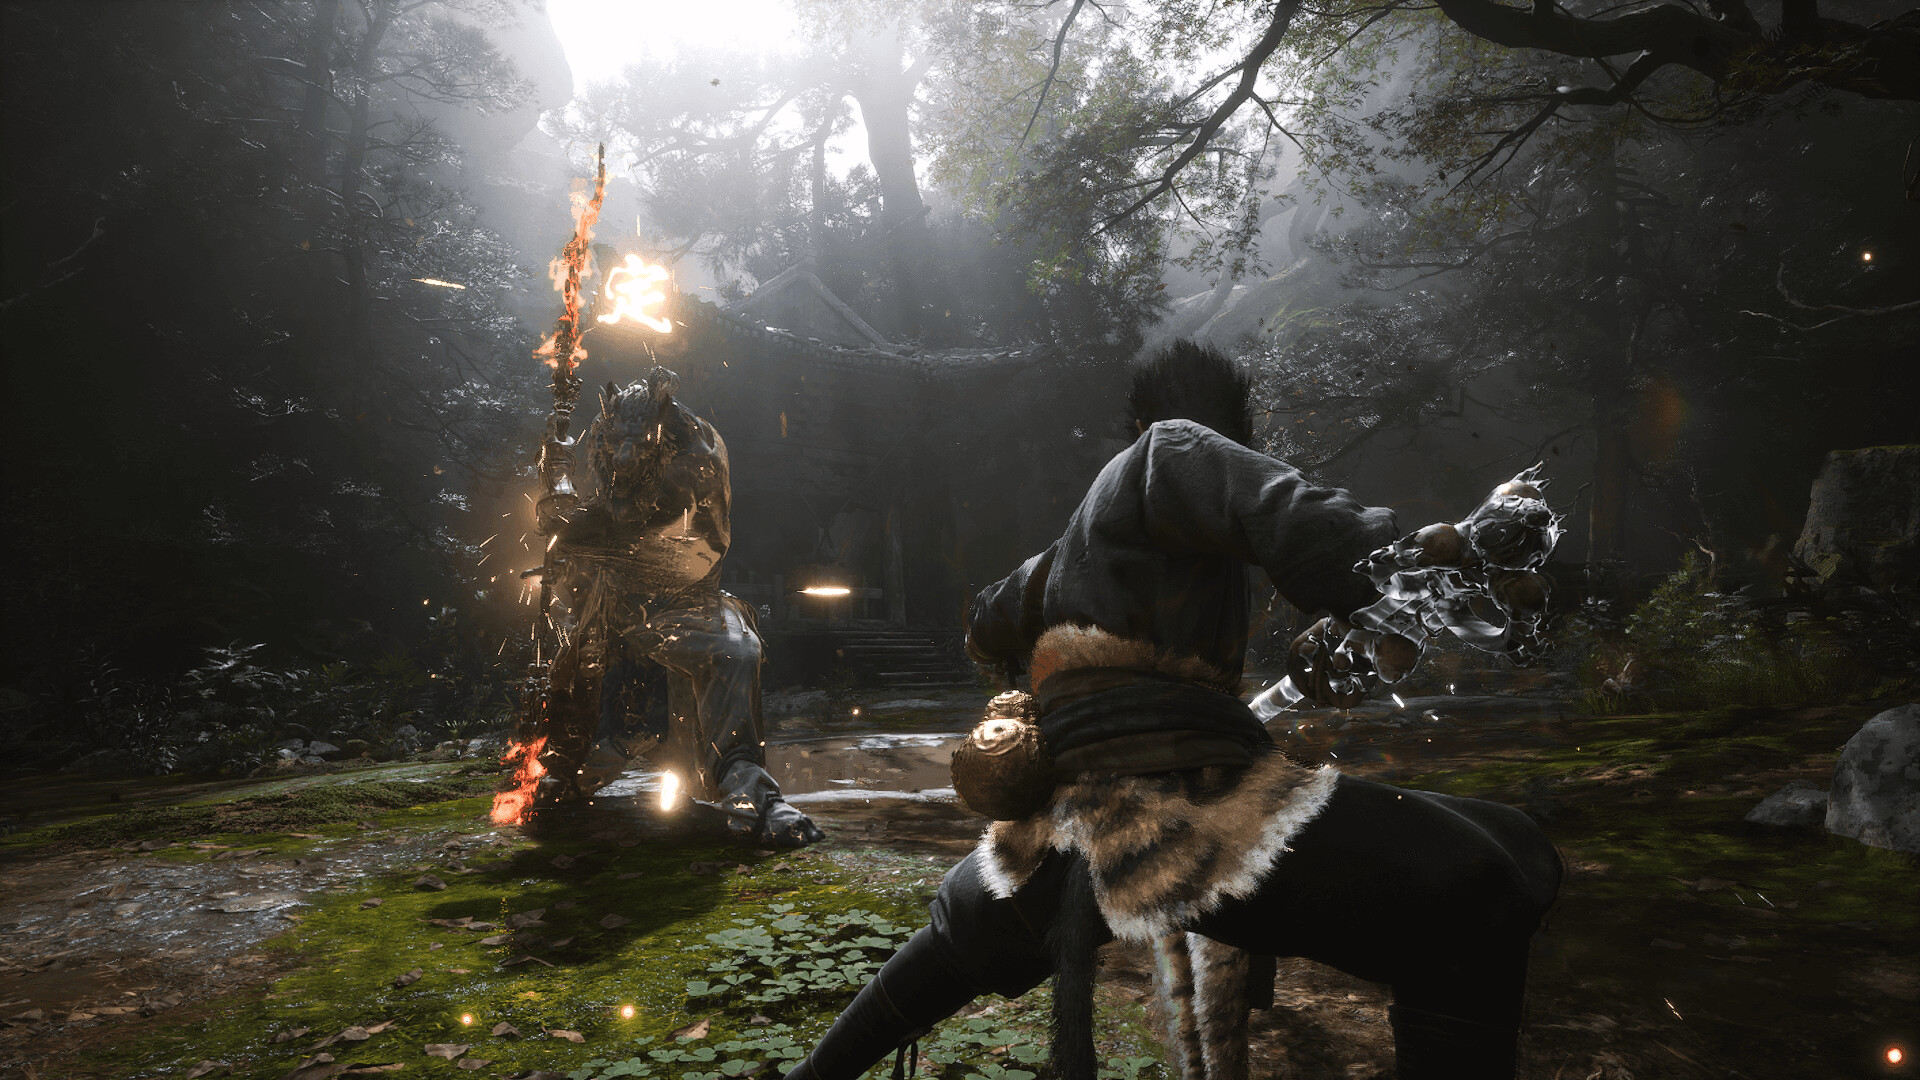
So you bought the game, you got past the intro cutscene, and now you're stuck on the first real boss—the Wandering Wight, that giant headless monk with the bell. You've died twelve times. You're wondering if you accidentally picked the hardest difficulty. Relax. You're not bad. The game just didn't tell you three critical things:
- You are not supposed to fight him at level 1. That's the big one. The game funnels you toward him immediately, but he's a skill check for later. I spent my first two hours dying to him before I realized I could just... leave. Go explore the forest. Fight the little snake guys. Level up your Spark abilities. Come back at level 12 or 13. He goes from "impossible" to "tough but fair."
- Your dodge timing is different from every other game. In Dark Souls, you dodge into attacks. In Wukong, you dodge at the last second. There's a tiny window where you can trigger a perfect dodge that leaves a white afterimage. That's your "get out of jail free" card. If you're panic-rolling early, you're eating damage every time.
- Resource hoarding is a trap. I know you want to save all your healing gourds for the boss. Don't. Use them during exploration. The game respawns enemies when you rest at a shrine (most of them, anyway), and your gourds refill. If you're sitting on 5 charges while fighting a basic mob, you're playing scared. Spend them.
The real pain point is the skill tree. It's not intuitive. You get Spark points like skill points, but you can't respec easily until you're maybe 10-15 hours in. So if you dump all your points into pillar stance because it looks cool, and then realize it's slow and leaves you open, you're stuck. I did exactly that. I thought I was being clever. I was not.
First Steps: What I Wish Someone Had Yelled At Me Before I Started
Alright, you fresh monkey. Listen up. Here's your checklist for the first three hours that nobody gives you:
- Spend your first Sparks on the dodge upgrades. In the Martial Arts tree, there's a node called "Agile Dodge" or something similar—it gives you an extra frame of invincibility. Grab it immediately. Also get the one that reduces stamina cost for dodging. You're going to spam dodge. Own it.
- Don't upgrade your starting staff past +2. The early upgrade materials are rare. You'll find a better weapon in the second chapter that makes your starter look like a stick. I upgraded mine to +3 and immediately found a Spike Staff that outclassed it. Wasted materials.
- Learn to parry with the rock transformation. You get a transformation ability early on—the one that turns you into a rock golem. Most people ignore it because it feels clunky. It's not. Activate it just before a boss wind-up and you'll absorb the hit and counter. It does 350 base damage on the counter. That's more than your heavy attack. Use it.
- Your sprint has a "super armor" start-up. If you hold sprint and press attack at the exact moment you start moving, you do a lunging strike that has hyper armor. It's not a real move in the tutorial, but it works. I abuse this against fast enemies.
- Talk to every NPC twice. I know, it's annoying. But some of them give you side quests only after a second conversation. I missed a free Spark point from the old man near the first shrine because I only talked to him once and ran off.
Oh, and one more thing: the map is not linear. You can climb over certain walls and rocks that look like background decoration. If you see a ledge with a glowing mushroom on it, there's probably a secret path. I found a hidden Healing Gourd upgrade behind a waterfall in chapter 1 that I almost walked past. Check every corner.
🔴 Pro Tip: The "Gourd Cancel"
You know how drinking your healing gourd locks you into a long animation where enemies can smack you? If you tap your dodge button immediately after taking a sip, you cancel the end of the animation. You still get the heal, but you're mobile way faster. It's not a bug—it's been in since launch. I learned this after getting killed by the Black Bear Guai mid-sip four times. Now I never drink standing still.
Expert Tips & Tricks From Someone Who's Been Stuck For Hours
I've got about 120 hours in this game across three playthroughs. I've done a "no damage" run (that I failed spectacularly at the last boss). I've tried every build. Here's the stuff that actually matters:
Builds That Work vs. Builds That Suck
Everyone online screams about the "Spark Mage" build—maxing your blue flame spell and spamming ranged attacks. Don't do it. It's bad. The spell takes 3 seconds to cast, during which you're a sitting duck. On Normal difficulty, you run out of mana after four casts and then you're useless. Instead, go hybrid melee. Put 15 points into your staff combos, 10 into the "Wind Step" tree (the teleport dodge), and the rest into passive health upgrades. You'll outlast bosses.
Boss Specifics
- Wandering Wight: Stay mid-range. He has a grab attack that does 70% of your HP if you're close. Bait his slam, dodge forward, get two light hits, back off. Repeat for 4 minutes. It's boring but it works.
- Black Bear Guai: This guy is weak to fire. There's a Flame Lamp consumable you can craft from the Ember Beetles you find near lava pools. Throw it at him and he staggers for a full 3 seconds. During that window, use your heavy attack combo. I killed him on my third try after I started using these.
- Yellow Wind Sage: The most unfair boss in the game, hands down. He has a "wind push" attack that hits across the entire arena. The trick is to stay right on his left hip. His hitbox doesn't cover that angle well. Also, save your transformation for his second phase, when he summons tornadoes. Transform, spam light attack, and you'll stagger him out of the animation.
Hidden Systems
- Focus Bar: That yellow bar under your health? It fills when you land consecutive hits. At full Focus, your next heavy attack is a "critical" that does 2.5x damage. But here's the kicker: if you hold the heavy attack button while the bar is full, you do a special move that's different per staff type. The Spike Staff does a spinning slash that hits twice.
- Enemy Weaknesses: Every major boss has a specific spell weakness. The Lightning spell (you get it in chapter 3) is good against metal enemies. Poison is for organic ones. Test one cast at the start of a fight. If they flinch, spam it. If they don't, switch.
- Respeccing is unlocked through a side quest in chapter 2. Talk to the Drunken Boar near the bridge. He'll give you a quest to find his lost wine. Finish that and you get a Reroll Stone that lets you reset your Spark tree at any shrine. Prioritize this.
Common Mistakes That Got Me Killed (Don't Make Them)
I've made every mistake in this game. Let me save you the pain:
- Mistake 1: Chasing the "perfect" dodge. You'll see speedrunners doing no-hit runs and think you need to perfect dodge everything. You don't. Just normal dodging (without the white flash) still avoids most attacks. Only the "unblockable" red attacks require a perfect dodge. If you're trying to time everything perfectly, you're overthinking it. Just dodge.
- Mistake 2: Ignoring the consumable bag. You have a hotbar for items. I didn't use it for the first 10 hours. The Resist Potion (craft from 2 Lotus Seeds) gives you 25% damage reduction for 15 seconds. That's huge for boss fights. I beat the final boss thanks to stacking three of those.
- Mistake 3: Fighting locked on. The lock-on system in this game is janky. It sometimes locks onto a random enemy across the map and won't switch back. Learn to fight without lock-on for groups. Only use it for single bosses. I died to a pack of Stone Golems because I was locked onto one in the back while the one in front crushed me.
- Mistake 4: Selling your old gear. In chapter 4, there's a crafting system that lets you upgrade old weapons into new forms. If you sold your Rusty Staff, you're locked out of a whole weapon tree. Keep everything until you beat the game. The inventory space is unlimited.
- Mistake 5: Not using the "Cry of the Monkey" emote. There's a secret area in chapter 3 with a giant door that only opens when you perform a specific emote in front of it. It's a hidden developer Easter egg, but inside is a +3 mana ring. I missed it on my first playthrough and had to backtrack 2 hours.
FAQ: The Stuff The Tutorial Doesn't Tell You
- Q: How do I respec? I messed up my build.
A: Complete the "Lost Wine" side quest in chapter 2. Talk to the boar NPC near the second shrine. He'll ask for a bottle of Celestial Wine, which you find in a chest next to a waterfall. Turn it in, and he gives you a Reroll Stone. Use it at any shrine to reset your Spark tree. You can do this unlimited times. - Q: Why can't I upgrade my healing gourd?
A: You need Gourd Seeds from special enemies. They drop from the Giant Snake miniboss in chapter 1 (guaranteed), and then randomly from tree creatures in chapter 3. You give them to the Elder Monkey at the starting shrine. Each seed adds one more charge. Max is 10. - Q: Is there a "best" staff?
A: For raw damage, the Heavenly Staff from chapter 5. But my favorite is the Viper Staff from chapter 2, because it has a unique heavy attack that poisons enemies. It's not the strongest, but it's fun. - Q: How do I get more mana?
A: You don't. Mana is fixed per playthrough. There are rings that boost max mana by +1 or +2, but you can't level it. The trick is to use spells sparingly. Most fights, I use two spells max. Save your mana for the second phase of bosses. - Q: I can't beat the final boss. Any tips?
A: This guy has three phases. Phase 1: stay close and parry his sword swings. Phase 2: he gains a fire aura. Use your Ice Spell to cancel it. Phase 3: he goes berserk with massive AOEs. Use your transformation and just tank through it. I found that equipping the Resist Potion and the +15% damage reduction ring made the difference. - Q: Are the side quests worth doing?
A: Yes. Two of them give you permanent stat boosts. One gives you a third spell slot. The "lost cat" quest in chapter 3 is especially annoying (the cat is hidden behind a crate), but the reward is a +10% crit chance amulet. Do them all.
Sign in to post a comment.
Sign in with GitHub to join the discussion.
💬 Comments
What players are saying:
Dude, the gourd cancel tip alone saved my ass. I was getting styled on by the Black Bear Guai because I kept chugging like an idiot. Also, you're 100% right about the lock-on being janky. I swear it's got a mind of its own.
Hard disagree on the Spark Mage build being bad. I used it on NG+ and melted everything. But for a first playthrough? Yeah, you'll run out of mana immediately. Fair point. The section on the Wandering Wight is dead on though—I wasted 3 hours on that boss because I thought I had to beat him right away.
Nobody told me to talk to NPCs twice. I literally missed the Spark point from the old man and was stuck one point short of a key upgrade for the final boss. Came back here, re-read the guide, and that fixed it. Also, the "Cry of the Monkey" emote thing—I thought it was a joke, but it's real?? Found the ring. Thanks man.