
Why I Keep Coming Back to This Game
I've got about 400 hours in Cobalt Core. I didn't plan on that. I bought it on a whim during a Steam sale because the pixel art looked cool and I liked the idea of a spaceship roguelike where you actually control the crew, not just the ship. I thought I'd play for an hour, refund it, and move on. Instead, I spent the next three nights straight trying to figure out why my second run went so spectacularly wrong that my medic got spaced by her own emotional breakdown.
The thing that nobody tells you about this game is that it looks like a straightforward deckbuilder-slash-tactical combat thing, but it's actually a game about managing three separate resource pools — your ship's hull, your crew's mental state, and your card draw economy — while a boss chews through your shields and your pilot decides now is a great time to have an existential crisis. The difficulty curve is a brick wall, and the game offers you zero hand-holding. You either figure out the systems or you die horribly in sector 3. Every single run.
I've beaten the final boss on all four difficulty levels with every ship. I've done a pacifist run, a meme run where I only used the mineral cannon, and a run where my entire strategy revolved around making the enemy commander so depressed they surrendered on turn 4. This guide is everything I wish I'd known before my first 50 hours of getting my ass kicked.
The Stuff That Makes You Want to Throw Your Mouse
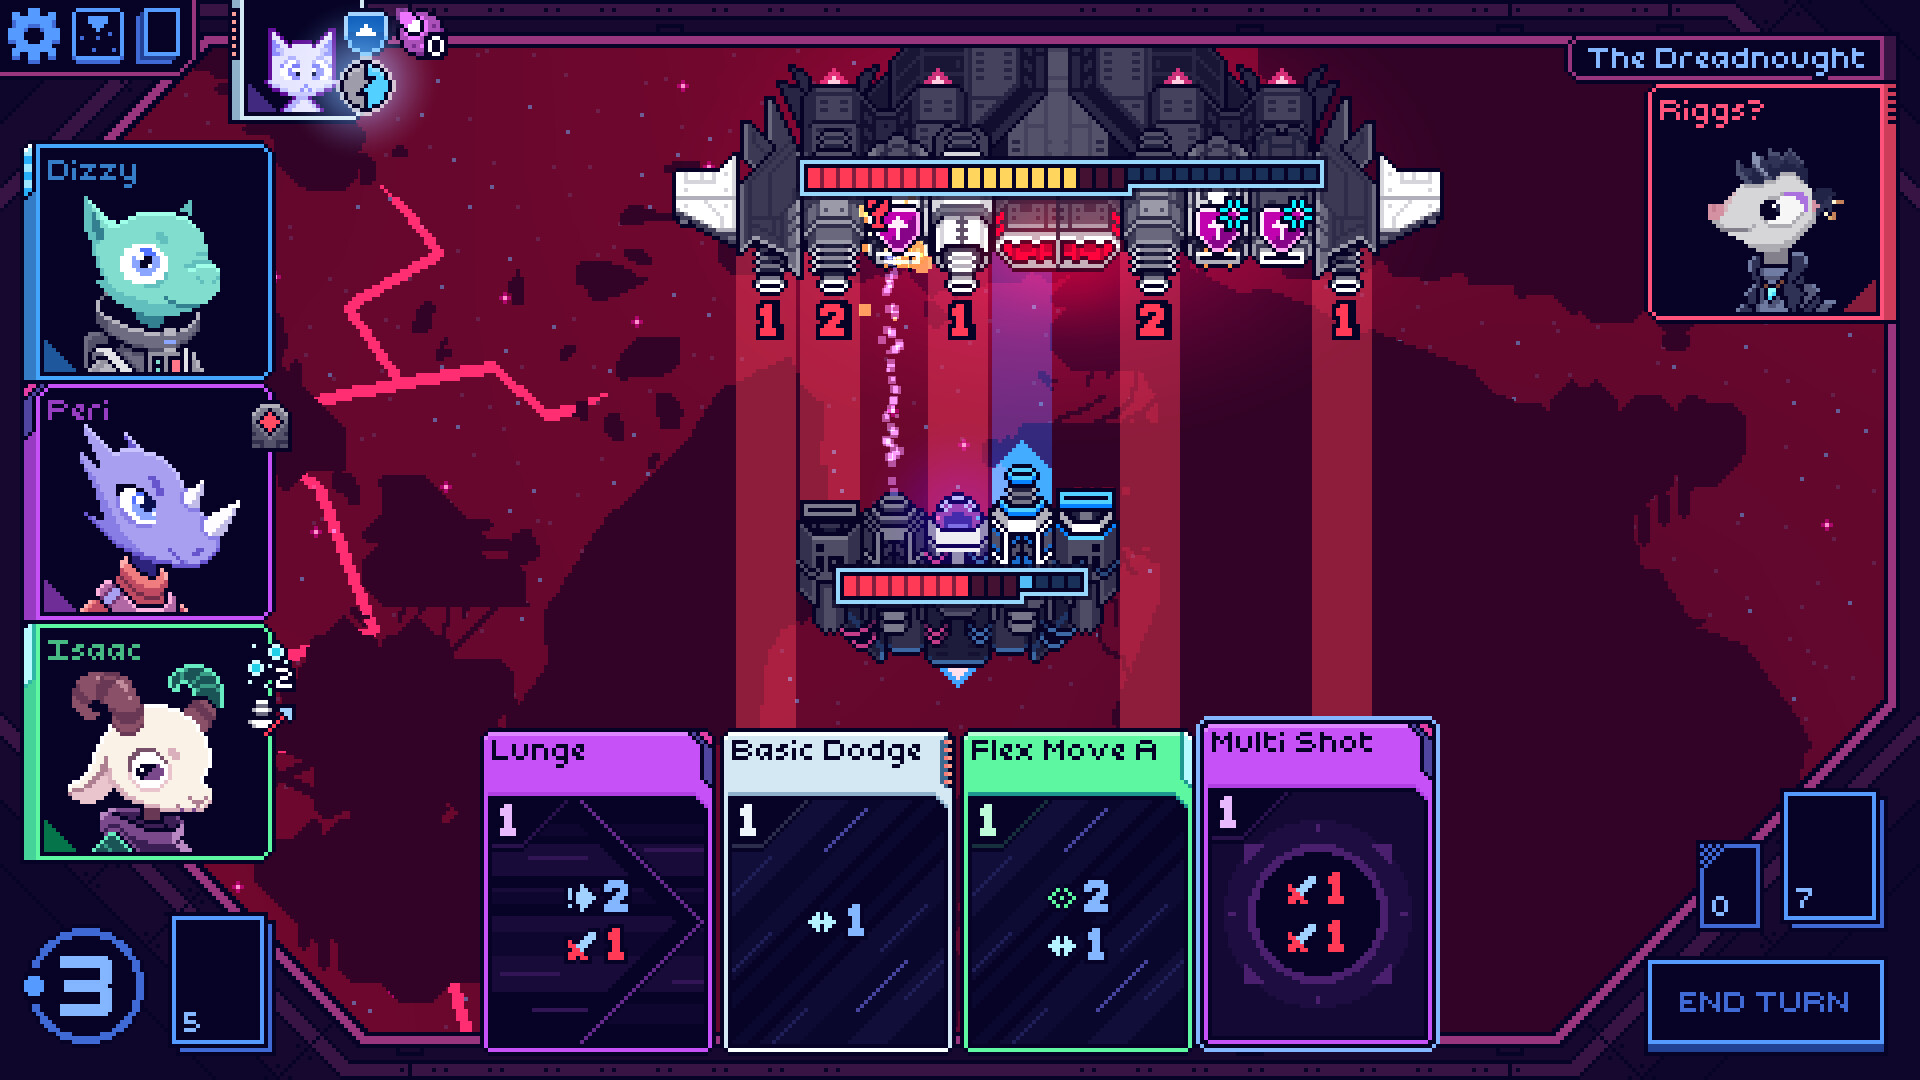
Let's be honest. The first time you hit sector 3 and the game throws a boss with 45 hull points and two shield generators at you while you're still running starter cards, you're going to feel cheated. I lost my first 14 runs in a row to the Harvester, that big spider-looking ship that spawns minions. Fourteen. I was convinced the game was broken. I reloaded saves, I restarted the game, I checked forums. Turns out I was just playing wrong.
The biggest pain point new players hit is crew management. The game tells you that each crew member has a health bar and a stress bar. What it doesn't tell you is that a stressed crew member — one that hits 100% stress — will actively sabotage you. I had a run where my engineer, Zeph, hit max stress and jettisoned half my fuel into space on turn 2 of a boss fight. I had to restart the whole run. That's not explained anywhere in the tutorial. You learn it by getting punished.
Another huge trap is card hoarding. The game gives you the option to remove cards from your deck at rest stops. Most new players, myself included, think "more cards = more options." That is dead wrong. If you don't aggressively cull your starter cards — especially the basic "Laser" cards that deal 4 damage for 1 energy — your draw pile fills up with garbage and you never see your good cards. I spent my first three runs trying to stack a poison deck with Drak and got destroyed by the second boss EVERY TIME because my deck was 35 cards of situational junk.
And can we talk about the Radiant difficulty spike? The jump from Normal to Hard in this game isn't a gentle slope. It's a cliff. Enemies get an extra action per turn, some bosses gain an entire phase, and your crew stress starts ticking up from turn 1 regardless of what you do. I beat Normal with three different ships before I finally scraped through Hard with the Phalanx. The game does not prepare you for this.
What You Actually Need to Know on Day One
Forget the tutorial for a second. Here's what you actually need to do to not die in sector 1.
First, pick the right starting ship. The starter ship, the Riggs, is fine but boring. The Phalanx is the best ship for new players by a mile. It starts with a shield that recharges every two turns for free, which buys you the time to figure out what your cards do without getting your face melted off. The other ships are situationally strong but require you to know the game's systems. The Phalanx lets you make mistakes and survive them.
Second, manage your crew's stress before you manage their health. Every time a crew member takes direct damage (not shield damage), their stress jumps by 15-20%. If they watch a friend get hit, it's another 10%. If their station takes damage, even more. You need to visit rest stops not just for healing hull damage but for stress recovery. I skipped a rest stop on sector 2 once because my hull was at 90% and I thought I was fine. My navigator hit 100% stress during the next fight and flew us into an asteroid field. Run over.
Third, learn to read the enemy intent. Every enemy has a little icon above their head showing what they're going to do: a sword icon means they're attacking, a gear icon means they're buffing, a question mark means they're doing something random. This is not optional information. If you see three enemy ships all showing sword icons, you need to prioritize shields or evasion that turn. If you see a gear icon, that's your window to go aggressive because they're wasting a turn. I ignored these icons for my first five runs. Don't be me.
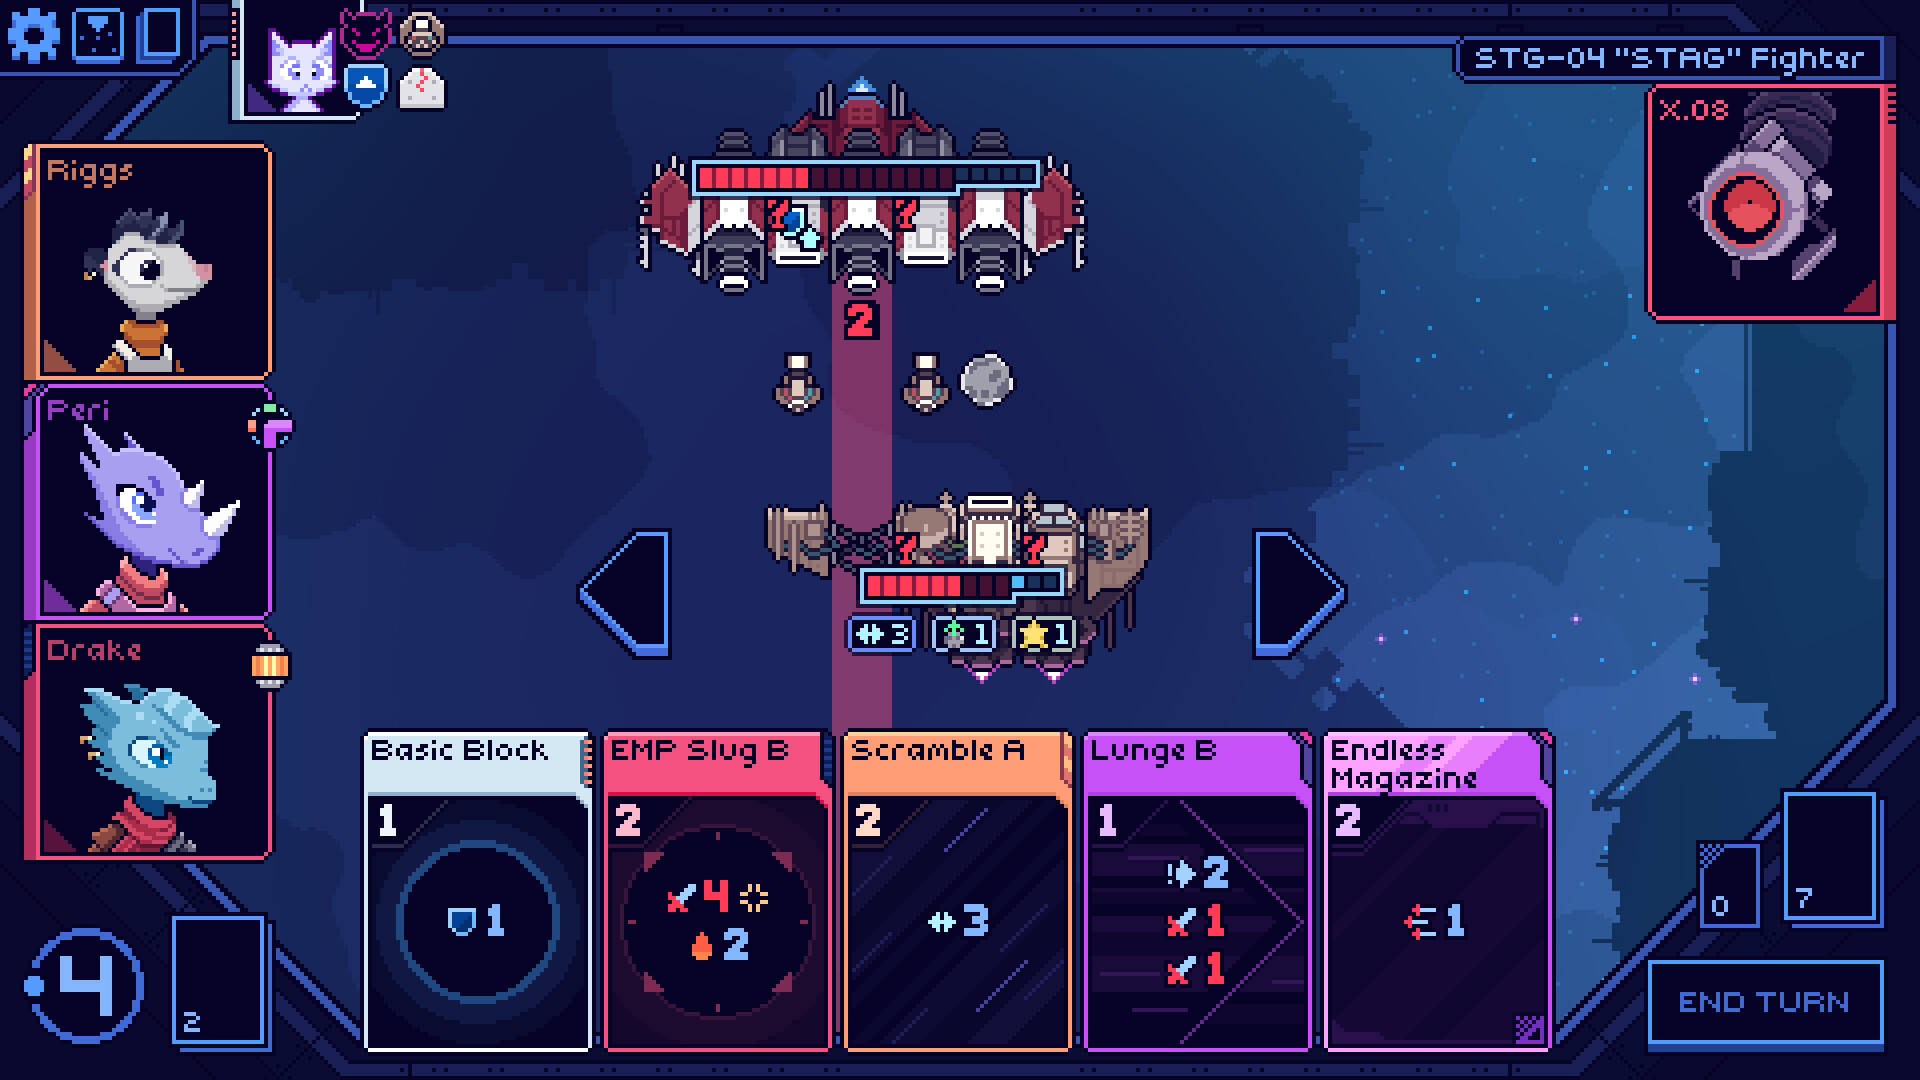
Fourth, cap your deck size early. Your starting deck is around 12 cards. You should never, ever have more than 20 cards in your draw pile. Every card you add that isn't a direct upgrade to your existing strategy is dead weight. If you get the option to remove a card, take it. Remove your basic Laser cards first — they're the worst cards in the game and they clog your draws. This is similar to how you want a lean, focused deck in Slay the Spire, except here your mistakes cost you crew stress instead of HP.
Fifth, learn the sector map. The map isn't random in the way you think. Sectors have a theme: Sector 1 is pirate space with lots of basic fights, Sector 2 is corporate space with more elite enemies, Sector 3 is military space with the hardest fights. The boss appears after sector 3. The map also shows you where rest stops, shops, and events are. If you see a route with two rest stops before a boss, take it. You need those stress resets more than you need an extra shop.
HARD-EARNED PRO TIP: When your crew member hits 80% stress, the game doesn't warn you. But at 80% stress, that character starts having a 30% chance to act twice instead of once — but also a 30% chance to refuse to act entirely. At 90% stress, both chances become 50%. You are gambling at that point. Do not enter a sector 3 boss fight with a crew member at 80%+ stress unless you're willing to lose the run to RNG. I learned this when my gunner decided to take a nap while the boss was charging its super cannon.
Expert Tricks That Separate a Win from a Wipe
Once you've got the basics down, you want to start thinking about synergies. Cobalt Core isn't just about picking good cards — it's about building a crew that works together. Here are the advanced tricks that turned my runs from desperate scrambles into controlled demolitions.
Overload stacking is your best friend. The Overload status increases the damage a ship takes by 2 per stack, up to a max of 10 stacks (20 extra damage per hit). If you build a deck around applying Overload — cards like EMP Missile (4 Overload, costs 2 energy) or Disruptor Array (3 Overload to all enemies, costs 3 energy) — you can stack Overload on the boss while your crew chips away. On turn 1 against the Harvester, if you hit it with EMP Missile and two basic lasers, that's 6 base damage + 4 from Overload = 10 damage on turn 1. Do that twice and you've bypassed its shields entirely because Overload ignores shields. This is how speedrunners kill the sector 3 boss in 4 turns.
Know which crew combos are broken. Some crew members have abilities that trigger off each other. Riley (the medic) has a passive that heals 2 hull per turn if her stress is below 50%. Gauss (the engineer) has a skill that reduces all crew stress by 20% once per fight. If you run these two together, you can basically ignore hull damage for the first 3 turns of any fight while you set up your offense. I did a run with Riley/Gauss/Drak (the gunner) and I didn't use a single hull repair card the entire sector 2. That's how relaxing a good crew comp is.
Energy management is the real puzzle. Most new players think "I need more energy cards." Wrong. You need energy efficiency. A card that costs 2 energy and deals 8 damage is worse than a card that costs 1 energy and deals 5 damage, because with 3 base energy per turn, the second card leaves you room to also play a shield card or a stress reducer. The best build in the game — I'm talking the one that got me my first Radiant clear — is a low-cost aggression deck with cards that cost 0 or 1 energy. Quick Fire (0 energy, 3 damage) and Double Tap (1 energy, 6 damage but requires your gunner to have acted already) let you chain multiple attacks in a single turn. I beat the final boss on Hard using only one card that cost more than 2 energy.
Use the environment. Some fights have environmental hazards like asteroid fields, solar flares, or ion storms. If you see an ion storm icon on the map, that fight gives you +2 energy per turn but all shield cards cost double. That's a high-risk, high-reward fight. If your deck is built around glass cannon damage, take the ion storm fight. If you're running a defensive turtle build, avoid it like the plague. I lost a run because I thought "free energy" was always good. It's not. The environment changes the rules, and you need to adapt.
Respec your crew at rest stops. Every crew member has a skill tree with three branches. Most people pick one path and stick with it. But you can respec for free at any rest stop. If you're about to fight a boss that does heavy AoE damage, respec your medic into the group heal branch. If you're going into sector 3 with a high-damage deck, respec your engineer into the energy generation branch. I didn't realize you could respec until hour 60. Don't be stubborn with your skill choices.
The Dumb Ways I Died So You Don't Have To
I've compiled a list of mistakes that killed my runs. Some of these I made multiple times. All of them are avoidable.
- Ignoring the "Draw Order" mechanic. This is one of the most subtle but important systems in the game. Each turn, your cards are drawn in a specific order based on card weight. Heavy cards (cost 3+) have a higher weight and are less likely to appear. Light cards (cost 0-1) have low weight and show up more often. If you fill your deck with heavy cards, you will consistently draw your light cards first while your heavy ones sit at the bottom. I built a deck with three 3-cost missiles and spent five turns drawing nothing but lasers. I had to look up the draw mechanics online to realize I'd sabotaged myself. Check your card weights in the deck screen before you leave a rest stop.
- Not using the "Evasion" stat. Every ship has an evasion percentage that determines the chance to dodge an incoming attack. Base evasion is 5%. Some crew skills and cards can boost this to 25-30%. At 30% evasion, you're dodging roughly one in three attacks. That's massive. I spent dozens of runs stacking hull and shields, completely ignoring evasion. Then I tried an evasion build with the Swift-class ship and a pilot with the "Ace" skill tree. The boss missed 3 of its 4 attacks in the final phase. I took zero damage. Evasion is criminally underrated.
- Hoarding artifacts. Artifacts are one-use items that provide powerful effects, like Emergency Shield (refills all shields instantly) or Stim Pack (reduce all crew stress by 50%). New players, myself included, save these "for when I really need them." Then you never use them and die with a full inventory. Use your artifacts. If you're above 50% hull and have a rest stop two turns away, pop that Stim Pack to keep your crew from going berserk. I once died holding two Emergency Shields because I thought I'd need them for the next boss. The next boss killed me before I could use them.
- Overvaluing "perfect" runs. Cobalt Core doesn't reward you for taking zero damage. There's no bonus for flawless sector clears. If you have to sacrifice a crew member's stress to kill an elite enemy before it wipes you, do it. I had a run where I refused to let my engineer take any stress damage, so I took extra hull damage instead. That hull damage cascaded into a hull breach, which killed my engineer anyway. Take the stress hit. It's recoverable. Hull is not.
- Forgetting about the "Command" action. On your turn, you can click on a crew member's station and choose a Command action instead of playing a card. This gives that crew member a flat 25% boost to their next action's effectiveness. It costs 1 energy and can be used once per crew member per fight. I didn't use this until hour 80. That's embarrassing. A Command-boosted heal from Riley heals 8 hull instead of 6. A Command-boosted shot from Drak deals 10 damage instead of 8. That's a free upgrade every fight. Use it.
This game has a lot in common with the resource management puzzle of Into the Breach, where every action has a cost and you're constantly trading one resource for another. Once you internalize that, you stop trying to "win" every engagement and start trying to "survive" them.
Questions I Wish Someone Had Answered for Me
Q: How do I unlock new ships?
A: Each ship is unlocked by completing a specific character's personal quest. You get these quests by taking crew members with you on multiple runs. Riley's quest triggers after she survives 3 runs as your medic. Gauss's quest triggers after he repairs 100 hull damage total across all runs. The game tracks this in the crew menu. You can check your progress for each character. Don't try to grind one specific unlock — just play the game and they'll pop naturally around run 15-20.
Q: Is there a "best" crew composition?
A: For beginners, Riley (medic) + Gauss (engineer) + Drak (gunner) is the most forgiving. Riley keeps hull up, Gauss keeps stress down, and Drak handles damage. Once you're comfortable, Zeph (engineer) + Sara (pilot) + Merek (gunner) is the highest damage comp in the game, but it requires you to kill enemies fast because you have no healing. You have to know what you're doing to survive with that team.
Q: How do I deal with the sector 3 boss (Harvester)?
A: The Harvester summons minions every 3 turns. Those minions deal stress damage to your entire crew if you don't kill them quickly. Bring AoE cards like Frag Grenade (3 damage to all enemies, costs 1 energy) or Rocket Salvo (2 damage to all enemies, costs 2 energy). If you can kill the minions in one turn, the boss becomes a punching bag. Focus the boss's shield generator first — it has 15 hull and once it's down, the boss can only regenerate 1 shield per turn.
Q: What's the deal with the "Mutiny" event?
A: If your crew's collective stress averages above 70%, there's a chance (around 20% per fight) that a mutiny event triggers. One crew member takes control and makes you play their hand for one turn. They might do something smart, or they might waste your energy on useless cards. There's no way to prevent it 100% except by keeping stress low. If you get the mutiny event and your crew member wastes your turn, that's on you for not managing their stress at a rest stop earlier.
Q: Is the game better with keyboard or controller?
A: I've played both. Keyboard is faster for card selection and menu navigation. Controller feels better for combat because you can move a cursor around the battlefield. Neither is strictly better — it's personal preference. I use keyboard for the strategic layer and controller for combat, but that's just me being weird. The game supports full controller remapping if you need it.
Q: How long does it take to beat the game?
A: A single successful run takes about 2-3 hours if you know what you're doing. If you're new and you struggle with the Harvester boss, expect your first win around run 15-20, which is roughly 10-15 hours of gameplay. That's assuming you're learning from your mistakes. If you're banging your head against the same wall, it could take 30 hours. The game is generous with unlock progression, so you'll have new ships and cards to try even when you're losing. That's how it keeps you coming back.
If you're coming from a game like FTL: Faster Than Light, you'll recognize the stress management system as a spiritual successor to FTL's crew health, but Cobalt Core is actually more punishing because stress cascades — one crew member hitting 100% stress can wipe your entire run in a single bad turn. Treat your crew like they're made of glass and you'll get further than most.
Sign in to post a comment.
Sign in with GitHub to join the discussion.
💬 Comments
What players are saying:
Holy crap, the bit about card weight changed everything for me. I was running a deck with three 3-cost missiles and wondering why I never drew them until turn 5. Dropped down to a lean 16-card deck with mostly 1-cost stuff and suddenly I'm actually doing damage. The Phalanx tip was solid too — that ship carried me through my first win. Thanks for not just copy-pasting the wiki.
I gotta disagree with the crew comp rec. Riley/Gauss/Drak is fine for learning, but Zeph/Sara/Merek with an evasion build absolutely slaps once you know the game. Took your advice on the Ion Storm fights though — that +2 energy with double-cost shields is a trap if you're not running a glass cannon setup. Lost a run learning that lesson the hard way. Solid guide overall, saved me from rage-quitting after my 12th Harvester death.
I never used the Command action once in my first 50 hours and now I feel like an idiot. The +25% boost to next action is huge — I tried it with Riley's heal and went from healing 6 hull to 8 hull on the same card. That's basically a free upgrade every single fight. Also, the mention of Into the Breach comparison is spot-on. This is the same "resource triangle" puzzle but with spaceships and mental breakdowns. Great write-up.