
Skip to a section:
So You Bought a Fishing Boat and Now You're Screaming at the Ocean
Let me guess. You saw the screenshots. Cozy little fishing game. Charming art style. Maybe a tentacle in the corner of a screenshot. You thought, "Yeah, I'll relax, catch some fish, upgrade my boat." Fifteen minutes later, you're panic-throttling your engine at 3 AM in complete darkness, something massive is thrashing behind you, and you've got a hull breach and three Panic debuffs stacked. Welcome to Dredge. You're not alone.
I've got about 120 hours in this game across four playthroughs. I've been that guy who lost a full hold of exotic fish because I thought I could "just make it" back to port at midnight. I've also been the guy who accidentally discovered a boss skip that saved my entire run. This guide is built from those exact moments. I'm not here to sell you the game or pretend it's easy. I'm here to tell you exactly what the game doesn't tell you, so you don't have to learn the hard way like I did.
If you're coming off something like Subnautica or Sunless Sea, you'll recognize the vibe. But Dredge has its own specific brand of cruelty. And I'm gonna help you survive it.
The Three Things That Make New Players Rage-Quit
Alright, let's get honest. There are three specific pain points that almost every new player hits, and the game does a terrible job preparing you for them.
1. Nighttime is not optional and it will murder you.
The game tells you "be careful at night." That's like telling someone to be careful with a grenade while you're already pulling the pin. Nighttime in Dredge isn't just dark — it's an active threat system. Your Panic meter builds, fish become corrupted, and entities spawn that can one-shot you if you're not moving. The first time night hits, you'll probably be out of position, low on fuel, and have no idea where a dock is. I spent my first three deaths just trying to figure out what was happening because the tutorial barely mentions it.
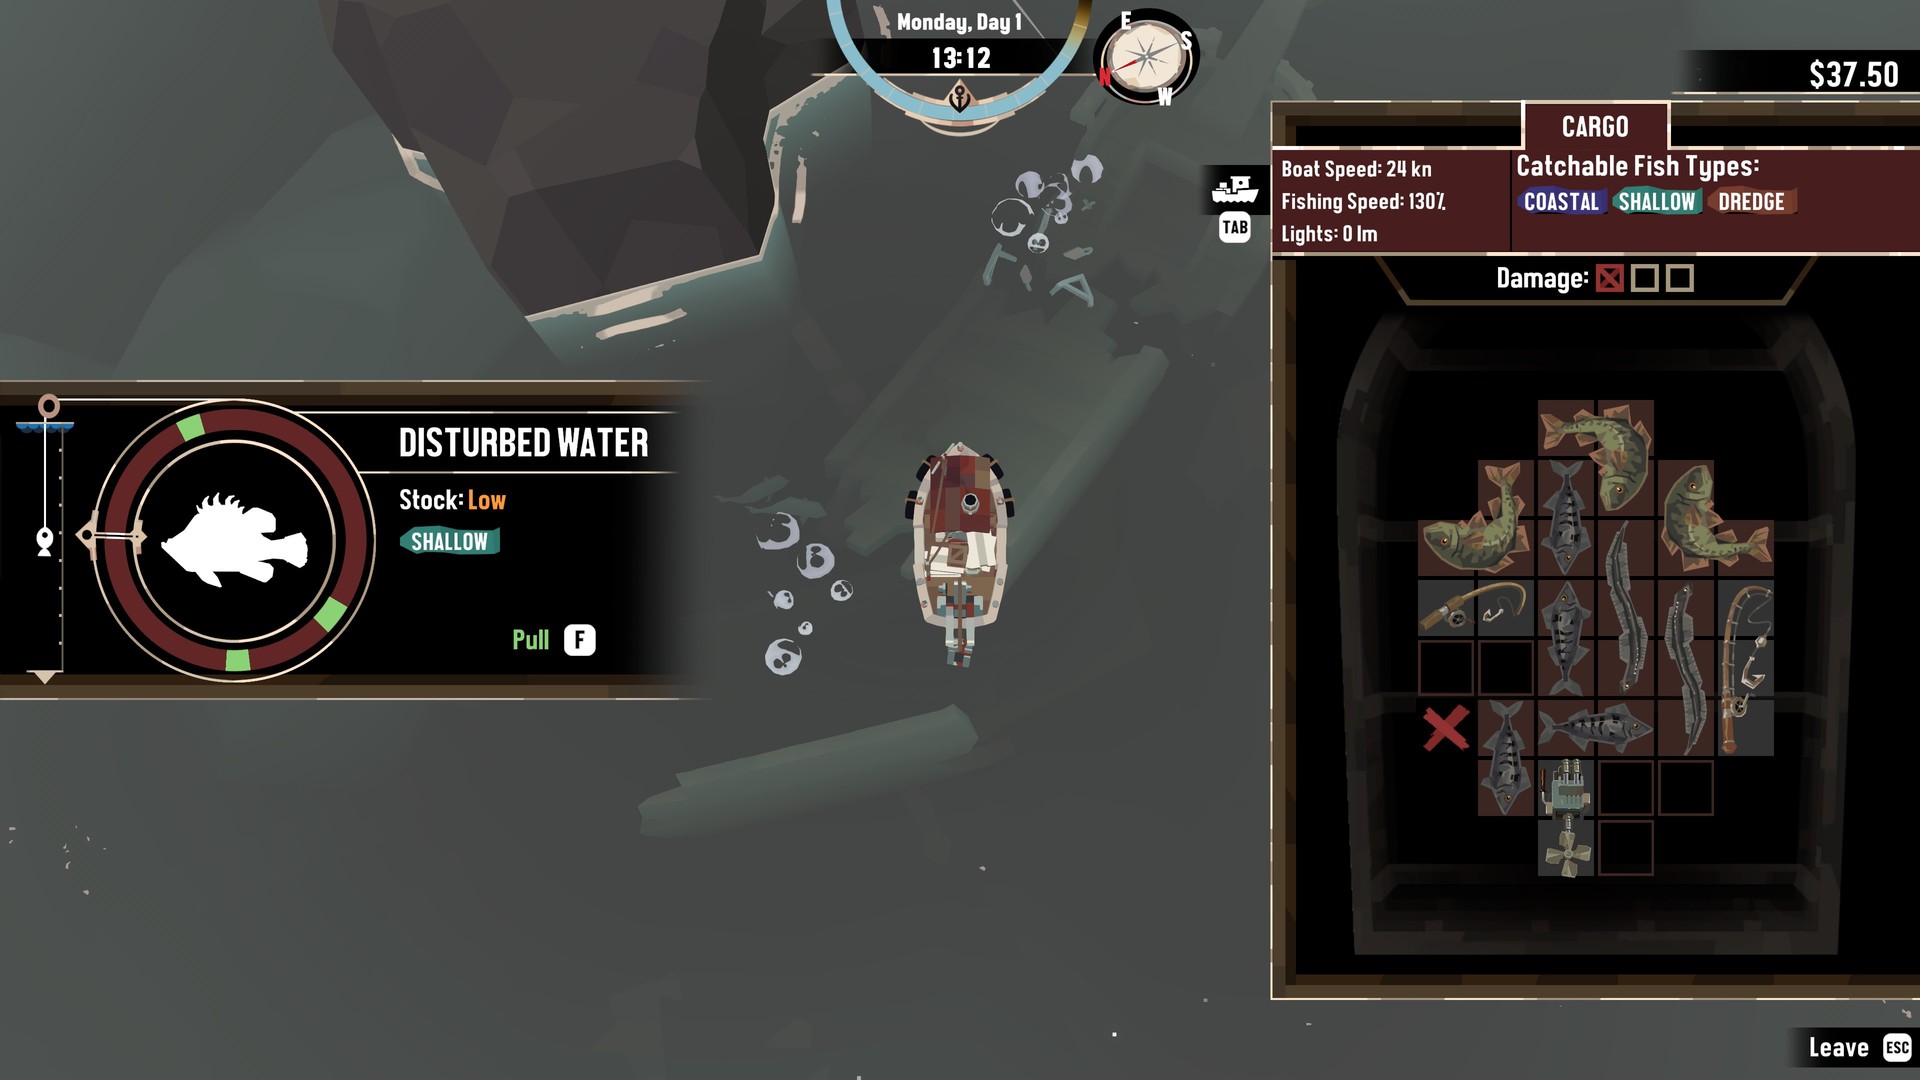
2. Storage space is a deliberate choke point.
You have 12 inventory slots when you start. That's it. The game wants you to feel that squeeze. You'll catch a rare fish, then immediately have to throw away something else. It's not a design flaw — it's a pressure mechanic. But it feels terrible until you understand how to manage it. Most new players fill their entire inventory with crabs and then panic when a full Moon event spawns a unique catch they physically cannot take.
3. The dredging minigame is a trap for impatient people.
That little minigame where you drag the net? It looks simple. But if you just haul it straight up, you get garbage, parts, and maybe a flatfish. The actual good loot — the research parts, the exotic fish, the relics — they require you to "drag" the dredge line over specific shapes on the seabed. I wasted probably six hours of my life pulling up nothing but Boots before I realized the minigame rewarded precision, not speed.
If you're already feeling these pain points, don't worry. We're about to fix all of them.
Your First Day: What You Actually Need to Know
Forget the tutorial. Here's your real day one checklist.
Start by fixing your boat's engine, not the net.
The first upgrade you get a choice on: Hull, Engine, or Net. Everyone says upgrade the Net first because you can catch more fish. That's a mistake. You need speed. A faster boat lets you outrun the nighttime horrors. It lets you cover more water before dark. It lets you run trade routes faster. I always dump my first two upgrade parts into the Engine. Get that speed stat from 2.5 knots to about 4.0. That difference is survival vs. death on day three.
Learn the three resource types.
Everything in this game is made from Scrap, Wood, and Metal. Later, Research Parts and Relic Fragments matter. But day one? You want Scrap more than fish. Scrap upgrades your gear. Fish only gives you money. If you see a debris field or a shipwreck, stop and dredge it. I've skipped entire fishing spots for a pile of Scrap, and I've never regretted it.
Set up a safe route on day one.
Look at the map. Find the nearest dock to the central area (Greater Marrow). Then plan a loop. You want to be able to go from any fishing spot back to that dock in under two in-game hours. The first time you try to "push it" and go further, the sun will set, and you'll be miles from safety. Mark the dock locations on your mental map. I still do this every run.
Never leave port without a backup light source.
Your boat light runs on fuel. It burns faster at night. If your light goes out at night in deep water, you're basically dead. I keep one spare Fuel Tank in my inventory at all times. Yes, it takes a slot. Yes, it's worth it. There is no worse feeling than the light sputtering out while something is chasing you.
Hard-earned pro tip that nobody told me: You can "pause" the dredge minigame at any time by opening your inventory. If you see a shadow in the water during the minigame, pause immediately. That shadow means a hostile is about to spawn. Wait for it to pass, then resume. Saved my ass more times than I can count.
Expert Tips That Turned Me from Prey to Predator
Once you've got the basics down, it's time to stop surviving and start thriving. These are the tricks I only learned after 40+ hours, and they completely changed how I play.
Use the "Sprint" ability (Shift by default) only as an escape, not for traveling.
Sprinting burns double fuel and makes noise that attracts threats. The game doesn't tell you that. I used to sprint everywhere and wondered why I was constantly getting chased. Now I only sprint when an enemy is within visual range. Otherwise, I chug along at normal speed. Your fuel will last three times as long.
Corrupted fish are not trash — they're a second currency.
Fish caught at night (or during a Full Moon event) have a "Corrupted" modifier. They sell for less at regular shops, but there's a specific NPC (the Wholesaler near the Stellar Basin dock) who buys them for a premium. I keep a separate storage section for corrupted fish only. That NPC turned my "waste" fish into about $2000 extra per night run. That's huge early game.
Chain your fishing rods for speed.
Each fishing rod has a "Time to Catch" stat. If you have two or three rods equipped (upgrade your boat's rod slots early), you can cast one, immediately cast another, and the catch timers run simultaneously. This is called "rod chaining." It's not a glitch; it's a mechanic. With three rods and chaining, I can catch 9 fish in the time it takes a single-rod player to catch 4. That's the difference between $100 a trip and $400 a trip.
The Pocket Watch is the most underrated item in the game.
You can buy a Pocket Watch from the Traveling Merchant for about $500. It lets you "skip" an hour of in-game time. Use this at dusk. If you're about to be caught out at night and you're close to a dock, use the Pocket Watch to skip to the next morning. It's essentially a get-out-of-jail-free card for timing. I never leave port without one.
Boss fights aren't about gear — they're about position.
The first "boss" everyone struggles with is the Leviathan at Marrow. You think you need a better gun or more armor. You don't. You need to bait his lunge, then circle to his left. Every boss in this game has a blind spot. The Leviathan's is his left side after an attack. If you stay in that pocket, you can land three hits before he turns. I beat him on my second playthrough with the starting pistol just by knowing the positioning. Gear is secondary. Patterns are primary.
Research Parts are the bottleneck. Hoard them.
You'll find Research Parts in dredging, shipwrecks, and puzzle chests. They let you upgrade your gear at the Crab Shack. Save them for the Flamethrower upgrade path. The base Flamethrower does 45 DPS, but after 3 seconds of continuous fire, it ramps to 120 DPS. That's the difference between chipping away at a boss and melting them. I regret wasting Research Parts on the shotgun path. Don't do it. The Flamethrower is king.
Check the weather forecast before you leave port.
This sounds stupid, but the game actually has a hidden weather system. If it's foggy, visibility drops to about 40% of normal. If it's stormy, your boat rocks and aiming is harder. I always check the sky. If I see rolling clouds or a dark haze, I plan a shorter trip. That fog has killed me more than any monster. You can't see the coastline, you can't see the rocks, and you can't see the Reef Sharks until they're on top of you.
The Mistakes I Made So You Don't Have To
Every single one of these is a mistake I've made personally, and every one cost me hours of progress. Learn from my pain.
- Ignoring the "Rubble" icons on the map. Those little gray X marks? They're not decoration. They're underwater ruins you can dredge for high-tier relics. I ignored them for 15 hours because I thought they were just map decorations. One of them gave me a +2 Speed boost permanent upgrade. I'm still mad at myself.
- Trading fish for upgrades at the first vendor. The vendor at Greater Marrow offers you a trade: X number of specific fish for a hull upgrade. Do NOT take this deal. The fish he asks for are almost always the rare ones you need for quests later. I traded away a King Crab for a +1 Hull upgrade, then spent 8 hours trying to find another one for a quest. Just pay cash for upgrades. Always.
- Fighting the Abyssal Horror at night. There's a boss called the Abyssal Horror in the middle of the map. If you try to fight it at night, it spawns minions. Infinite minions. I spent 20 minutes fighting before I realized the fight was literally unwinnable at night. Go during the day. The boss is still hard, but at least you won't get swarmed.
- Overfishing the same spot. Each fishing spot has a limited number of fish before it "depletes." Depleted spots take about 3 in-game days to regenerate. If you fish a spot dry and stay there, you're wasting time. I'd sit at "Marrow Depths" for half an hour wondering why I wasn't catching anything. Learn to rotate spots. I have three regular spots I cycle through.
- Not buying the Scrapper upgrade early. The Scrapper is a workshop upgrade that lets you break down unwanted items into Scrap. It costs about $1200. I put it off because I thought it was a waste. It's not. That "Shipwreck Debris" you find? The "Old Anchor"? Those become Scrap. I now generate about 15-20 Scrap per play session just from breaking down junk. It's the best money-to-value upgrade in the game.
Quick Answers to Questions I See Every Week
Q: How do I get more inventory space?
A: You can't upgrade inventory directly. You have to buy Storage Crates at the shipwright. Each crate adds 5 slots and costs $800. You can have up to 4 crates. Stack them on the deck of your boat. I prioritize crate 1 first, then hull upgrades, then more crates. Storage is the single biggest quality-of-life upgrade.
Q: What's the best early-money fish?
A: The Blue Mackerel sells for $12 each and is abundant in the starting area. But the real money is in Crab traps. Set three crab traps near the Greater Marrow dock. Check them every morning. I make about $300 per day passive income from crabs alone. You'll need to buy the Crab Pot blueprint from the shipwright for $200.
Q: How do I survive the Gauntlet area?
A: The Gauntlet (northern section) is a linear gauntlet of fishing spots with enemies. You need a minimum engine speed of 5.0 to outrun the predators there. Also, the Sonar upgrade is mandatory — it shows enemies on your minimap. Without it, you'll get ambushed repeatedly. I died six times in the Gauntlet before I realized I was under-leveled for it.
Q: Is the Flamethrower really the best weapon?
A: Yes, for bosses. But for general clearing of regular enemies (like the standard sharks and crabs), the Shotgun is better because of its burst damage. I carry both. Flamethrower for bosses, shotgun for crowds. If you're on a budget, get the shotgun first for grinding, then save for the Flamethrower.
Q: What does "Panic" actually do?
A: Panic builds up at night, near enemies, or when you take damage. At 50% Panic, your aim starts to drift. At 75%, you get hallucinations (fake fish appear). At 100%, you take damage over time and enemies are attracted to you. You can reduce Panic by docking, using a Calming Tea (bought from the trader), or hitting a Buoy in the water. Keep Calming Tea in your hotbar. It's a literal lifesaver.
Q: Can I fish anywhere?
A: No. Fishing spots are indicated by the colored circles on the water. Green = safe. Yellow = risky. Red = very dangerous. I've fished outside of circles and caught nothing but Trash and Seaweed. Stick to the circles. The Echo Sounder upgrade reveals hidden spots on your map — that's my second upgrade priority after the engine.
Q: How do I get rid of the Paranormal debuffs?
A: If you catch something cursed or talk to a certain NPC, you might get a debuff like "Nightmares" or "Claustrophobia." These only go away if you visit the Shrines scattered around the map. Each shrine removes one debuff per visit. There's one on the south island (near the Hermit's house). I always clear debuffs before a boss fight. They stack and they're deadly.
Sign in to post a comment.
Sign in with GitHub to join the discussion.
💬 Comments
What players are saying:
I wish I read this before my first run. The tip about the Pocket Watch saved my ass last night. I got stuck out at 2 AM with zero fuel and a boss chasing me. Skipped to morning right as I hit a dock. That one trick alone is worth the read. The rest is solid too, but the watch thing is a lifesaver.
gonna disagree on one thing. I actually think the Shotgun path is better than Flamethrower for the first boss. The flamethrower takes too long to ramp up and I kept getting hit during the animation. Shotgun burst let me burst the Leviathan in three phases. But for the final boss? Yeah flamethrower wins. Good guide overall. Storage crate priority is the real deal.
the dredge minigame pause trick is genius. i have 200 hours in this game and never thought of that. just tested it and it works perfect. also the part about rotating fishing spots - i was literally sitting on an empty spot for 20 minutes last week wondering why nothing was biting. thanks for making me feel less stupid.