
Skip to:
Yeah, This Game Is Hard. And That's Okay.
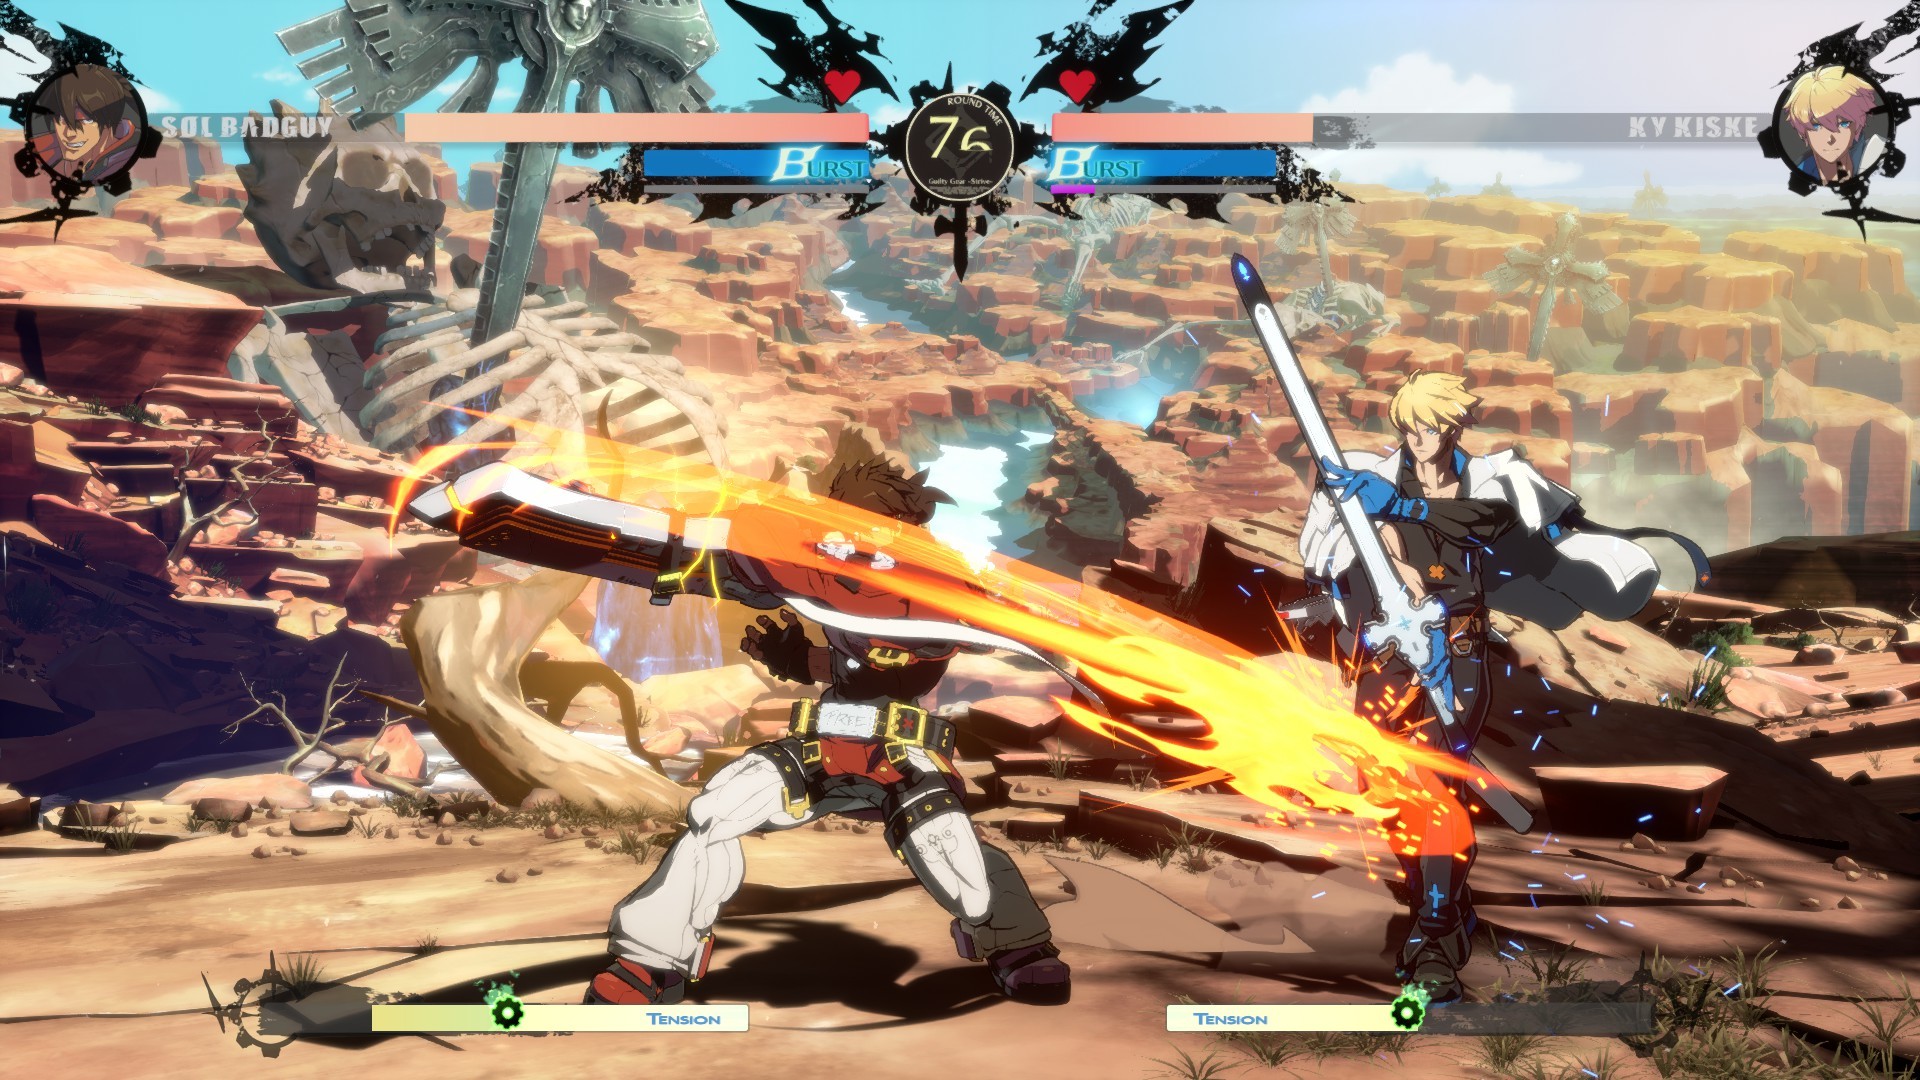
Look, I'm not gonna sugarcoat it: Guilty Gear Strive took me about 60 hours before I felt like I wasn't just mashing buttons and hoping for the best. I've been playing fighting games since Street Fighter II on a busted SNES pad, and this game still humbled me. Hard. You know that feeling where you get hit by Ramlethal's sword toss from full screen, then you're eating a combo that deletes 60% of your health before you even touch the ground again? Yeah, I've been there. It's infuriating. But stick with me, because once the "click" happens, there's nothing else like it.
Strive isn't your granddad's anime fighter. It strips away some of the absurd complexity of older Guilty Gear games (RIP to the 1-frame links of Xrd) but replaces it with a hyper-aggressive, explosive neutral game. Every interaction feels like a life-or-death bet. The game wants you to press buttons, but it also wants to punish you for pressing the wrong ones. It's mean. It's beautiful. It runs on Unreal Engine and looks like a playable heavy metal album cover.
I'm writing this guide because I wasted my first week doing dumb stuff like trying to max out Tension Gauge without ever using Roman Cancel. Don't be like me. This is the stuff I actually had to learn the hard way—the pain points, the broken mechanics, and the "why won't this game let me breathe" moments.
Why Players Struggle (And Why You're Probably Screaming at Your Monitor)
Let's get real about the three biggest things that make new players quit Strive within the first 10 hours. Knowing these upfront saves you a lot of heartache.
- Defense Is a Trap. You come from Street Fighter or Tekken, you're used to blocking and waiting for your turn. In Strive, blocking is a death sentence. Every character has frame traps, overheads, and command grabs that melt your health bar if you sit still. I spent my first 20 matches holding down-back, and I lost every single one. You have to take risks—fuzzy jumps, backdashes, and YOLO Yellow Roman Cancels—just to survive pressure.
- The Wall Break Mechanic Lies to You. The game tells you breaking the wall is good. It gives you a shiny Positive Bonus and resets to neutral. Here's the catch: if you break the wall with a super or a hard knockdown, you're giving your opponent a clean reset. I've lost rounds because I did the "cool" wall-break combo instead of leaving them cornered with their back against the wall. Sometimes, you don't want to break it. You want to keep them trapped like a rat.
- Input Buffer Hell. The game buffers inputs aggressively. This sounds helpful, but it means if you mash 5P during a blockstring and then try to 6P after getting hit, the game remembers your old input and you eat a second combo. I've done this more times than I can count—my character does a random jab during a knockdown because I pressed the button half a second too early. You have to learn to release the stick between actions. It's not intuitive.
The biggest lie the tutorial tells you is that Roman Cancel is an "advanced" mechanic. It's not. It's your lifeline. If you aren't using RC in every single match—even if you're just using it to make your whiffed attacks safe—you're playing on hard mode. Check out our Street Fighter 6 beginner's guide for comparison; SF6 actually has a decent combo trial system that teaches you common routes. Strive's tutorial goes "this is a Roman Cancel, you can do 30 things with it, good luck."
First Steps: What You Actually Need to Know Day One
Forget the character tutorials. Forget the missions mode (it's actually great, but save it for week two). Here's your day-one checklist.
Step 1: Pick a Character, Stick With Them for 50 Matches. I don't care if you lose. Everyone says "play who looks cool," and they're mostly right. But there's a catch: Sol Badguy and Ky Kiske are the actual entry points. Sol has Fafnir (his command grab that combos into a full punish) and Ky has Stun Dipper (a slide that's safe on block at max range). These characters teach you the core loop: get in, pressure, reset pressure. Don't pick Happy Chaos or Jack-O' until you've mastered movement. I made that mistake. I spent three hours with Happy Chaos not understanding why my gun kept jamming.
Step 2: Learn to Roman Cancel Before You Learn a Combo. Go to training mode. Set the dummy to block randomly. Do a jab, then immediately press RC (Dust + Attack macro or 3 buttons). See how you recover fast enough to block? That's your get-out-of-jail card. Now do a c.S, wait a beat, then RC. You can now run up and grab them. This single technique—the red RC—wins more games than any combo. I've beaten Floor 10 players just by doing c.S > RC > run up throw three times in a row. It's degenerate. It works.
Step 3: Bind Your Dash Button and Faultless Defense Now. Default controls are trash for this game. I don't care what platform you're on: bind Dash to a shoulder button (L1 or R1), and bind Faultless Defense (FD) to another shoulder button. FD is your block button that pushes enemies away. If the dummy is doing a blockstring, hold FD and they'll eventually slip out of range. If you're playing on keyboard, set your dash to Spacebar. Double-tapping forward for dashes is inconsistent in this game—the input window is strict, and you'll walk forward into a Potemkin Buster. I've done it.
Step 4: Forget Combos. Focus on Hit Confirms. A "hit confirm" is when you throw out a fast move (like f.S or c.S) and ONLY press the next button if you saw it connect. If it whiffs or gets blocked, you stop. This is the single hardest thing for new players. Go into training mode, set the dummy to block randomly, and practice: throw a c.S (a standing punch), and if you see the spark of a counter hit OR the dummy doesn't flash white (blocking), do your special cancel. If it blocks, do nothing. Once you can do this on autopilot, you're ready for ranked.
Expert Tips & Tricks (The Stuff That Actually Separates You From the Pack)
I'm not a pro. I'm a Floor 10 player who sometimes dips into Celestial if the stars align and the Sol mains are having an off day. But I've grinded enough to know the specific tech that most guides skip.
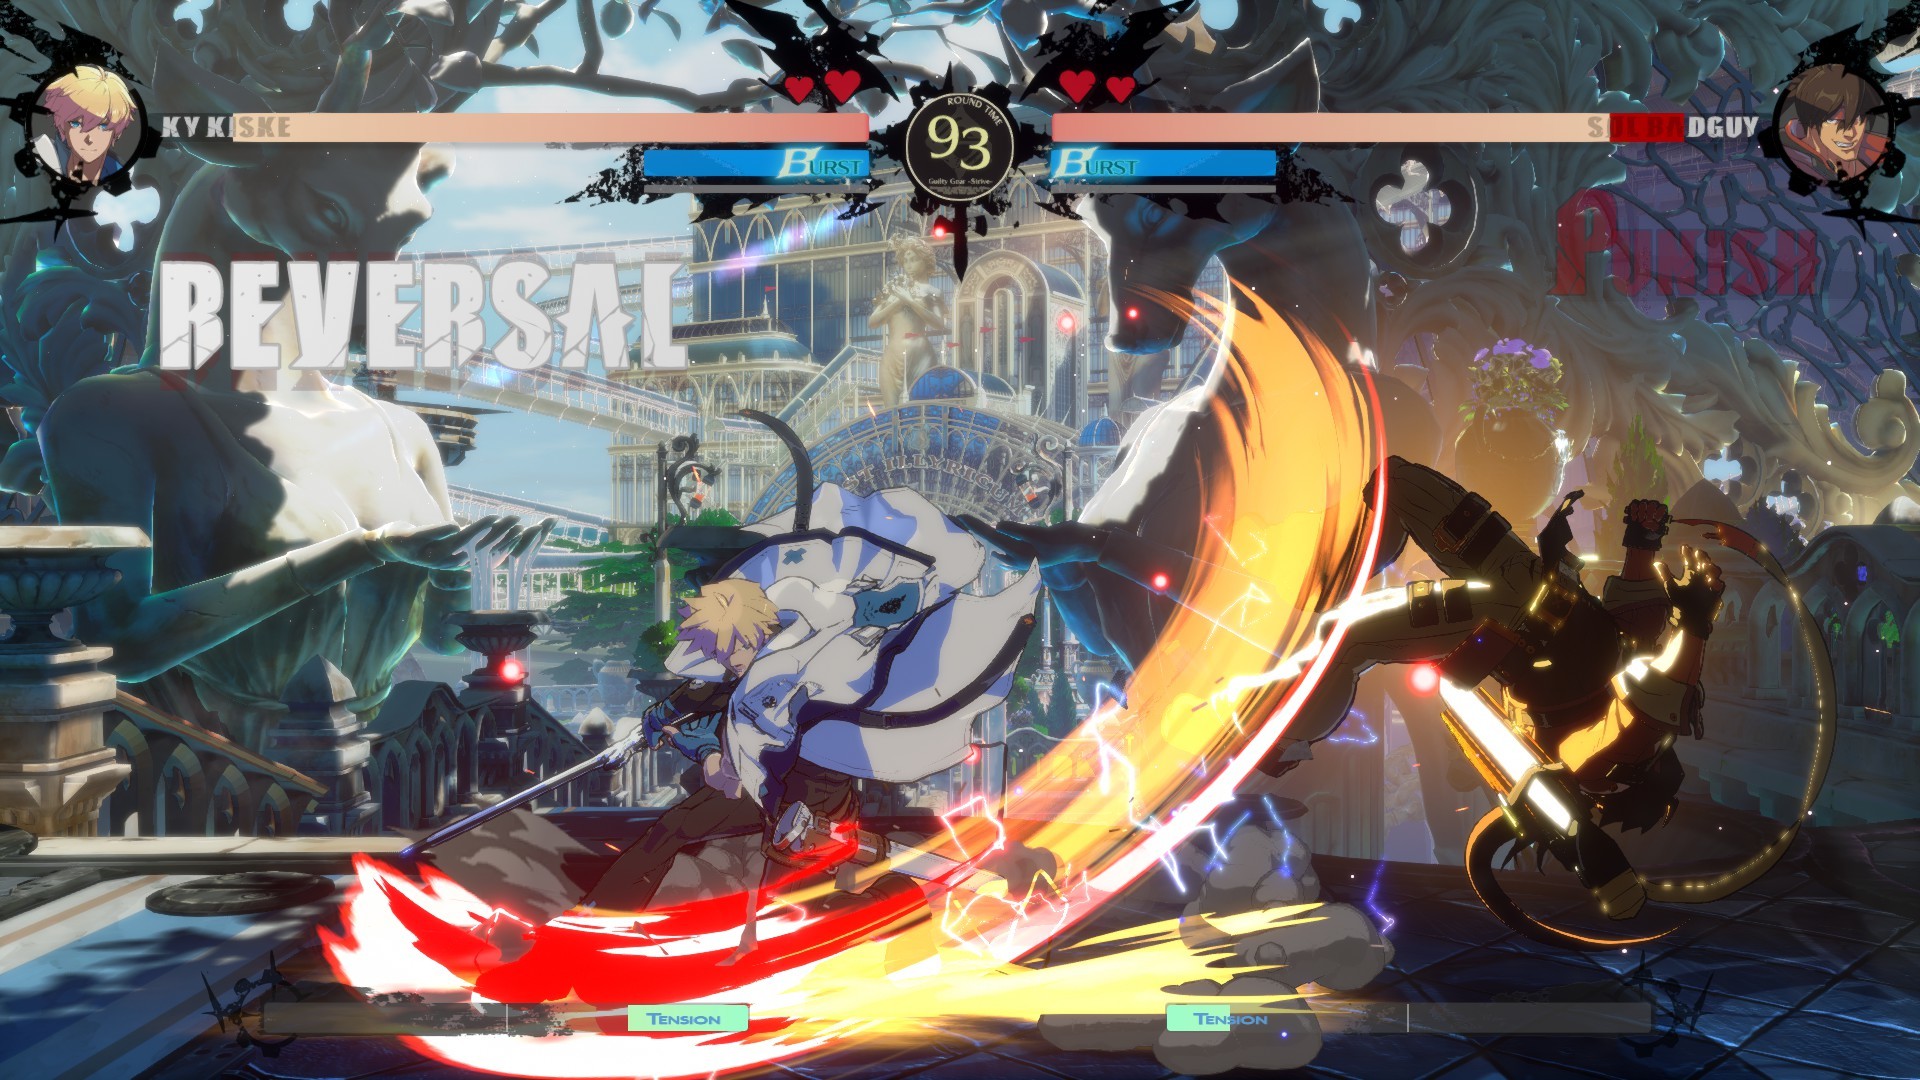
Pro Tip: The "Air Throw Reset" That Nobody Expects. Most players think air throw is just for punishing jump-ins. But you can air throw your opponent right after a wall break if you time it during the slo-mo. The wall splat animation has a specific window where both players are airborne. If you jump and air grab them during the shatter, you get a hard knockdown that they can't tech. I've stolen at least 40 rounds with this. The timing is tight: do the air grab input the frame you see the wall crack.
Tension Gauge Management: The 50% Rule. You want to always have 50% Tension in your pocket for a Yellow Roman Cancel. Yellow RC is the one where you press RC while in blockstun. It eats 50% Tension and knocks the opponent away, giving you breathing room. If you have 45% Tension, you can't do it. I've lost rounds where I was one poke away from death because I spent my Tension on a Romeo Cancel combo that was overkill. Never let your gauge drop below 50% unless you're about to kill. If you hit 40%, back off and Faultless Defense until it refills.
Wall Breaks: When to NOT Press the Dash Macro. After a wall break, the game auto-runs you forward. But you can input back right when the camera resets to stop your momentum. If you keep running forward, you're eating a 6P to the face. I've had players run directly into my May's 6P (the anti-air that hits low) because they forgot to cancel their auto-run. Also, after a wall break, your opponent gets Positive Bonus (free Tension). If you're the one who broke the wall, you get it too. But if you break the wall with a super and they're already dead, you don't get the bonus. It's a weird interaction—sometimes it's better to let them live and keep the corner.
Character-Specific Tech You Should Steal:
- Sol Badguy: Bandit Revolver (214S) is -2 on block. That means most jabs will trade or lose. But if you do Bandit Revolver into RC, you're +15 and can do a running throw. It's a gapless setup that catches everyone up to Floor 9.
- Ky Kiske: Stun Dipper (236K) is safe at max range, but most players try to punish it. If you do Stun Dipper and hold down-back immediately, you'll block their retaliatory jab and then 5K into a full combo. I've conditioned entire sets around this.
- Potemkin: Your Garuda Impact (236S) is +2 on block and leaves them standing. That means your 5K will beat their jab every time. If they start mashing, they eat a Buster. If they block, you're +2 again. Infinite pressure loop.
- Giovanna: 214K (the dive kick) is -12 on block, which is terrible. But if you do 214K > RC, you're safe and can pressure again. Don't do the dive kick raw unless you're absolutely sure it'll hit.
Roman Cancel "Fake Outs" That Win Neutral. If you press RC while the dummy is full screen, the game slows down for a second. Your opponent will instinctively press a button or try to dash in. Use that second of slow-mo to see their reaction. If they dash, you 6P them. If they throw a fireball, you jump. I've started using RC as a "pause button" to scout habits. It costs 50% Tension, but if it wins you the round, it's worth it. Check out our Dragon Ball FighterZ beginner guide for more on input reading; the same principle applies here but with slower reaction times.
Common Mistakes That Keep You at Floor 5
These are the habits I see from every player who claims "the game is broken" or "I can't win."
- Mashing on Wake-Up. Strive doesn't have a traditional "wake-up reversal" unless you spend 50% Burst or use a super. If you press a button on wake-up, you will get counter-hit and lose 40% health. Every time. The only safe options are: block, backdash, or wake-up super (if you have meter). Stop mashing. I promise your opponent is just doing c.S > delay > c.S to catch your jab.
- Not Using Dust Cancel. Your Dust attack (the overhead) is super slow but gives a full combo on hit. If you do 5D and hold up, you do a sweep that's low. If you tap up during a 5D, you cancel into a normal attack. This is called a Dust Cancel. Use it to mix up your blockstrings. Do c.S > f.S > 5D > cancel into 5K. If they block the 5D, you're safe. If they get hit, you get a wall splat. I see so many players do 5D raw and get punished. Don't be that guy.
- Ignoring the "Blocked" Sparkle. When you block a move, the game shows a white spark. If you see that spark, stop pressing buttons. The most common "I lost because of this" moment: you block a Sol Bandit Revolver, you try to jab, he does another Bandit Revolver, you're dead. Wait for your turn. The turn "ends" when the opponent does a move that is -5 or worse. If you don't know the frame data, just block and Faultless Defense them away.
- Overusing Roman Cancel in Neutral. I said RC is good. But I see Floor 5 players doing c.S > RC > c.S > RC > c.S > RC until they run out of Tension. That's 150% Tension wasted for one combo that does 200 damage. Use RC to extend combos you dropped or to make unsafe moves safe. Don't use it to style. You're not a YouTube combo video.
FAQ (The Questions I Actually Get in Discord)
Q: Why does every character have a 6-frame jab that beats mine?
A: They don't. 5P (your fastest button) is typically 4-5 frames startup. The issue is range. Sol's 5P reaches way further than May's 5P. You're getting hit because your attack whiffed at max range. Go into training mode, set the dummy to 5P, and measure the distance. Most characters can't hit you from half screen.
Q: How do I deal with Potemkin's command grab?
A: Potemkin Buster has 5 frames startup. You can't react to it. The trick is: jump. If you're in the air, his grab misses. Some characters have air dashes that beat it. Or use Faultless Defense to push him away—his grab range is short. But the real answer: don't let him get close. Zone him with f.S or 236S. If he's in your face, you're dead. That's the matchup.
Q: Should I use the "Dust" button for combos?
A: Only for Dust Cancel or if you confirm a raw hit. 5D is 20 frames startup. That's reactable. If you throw it out randomly against a Floor 8 player, they will 6P you into the stratosphere. Use it as a mixup in blockstrings, not as a neutral tool.
Q: Is the game pay-to-win with DLC characters?
A: No. The base roster is balanced. Nagoriyuki and May are top-tier and are in the base game. Happy Chaos is strong but requires insane execution. Asuka is a nightmare to play. Don't blame DLC for losses. Blame your blockstrings.
Q: How do I stop getting hit by the same 3-move string?
A: Watch the replay. I'm serious. Strive has a great replay system. Look for the gap. Most blockstrings have a 3-frame gap between moves. If you see that gap, press 6P (universal anti-air, but it's actually a high-commitment counterpoke). If you can't find the gap, it means you're not blocking correctly. Some strings are "true" (no gap) and you just have to eat them or use Yellow RC.
Q: Any settings changes I should make?
A: Turn off Input Lag Reduction if you're playing online. It causes weird rollback issues. Set Input Display to ON in training mode so you can see your inputs. Lower your SFX volume to 70%—the game's audio is loud and masks the sound cues for when pressure is over. Check out our Tekken 8 settings guide for more universal fighting game adjustments, but for Strive specifically, bind Dash to a shoulder button.
Sign in to post a comment.
Sign in with GitHub to join the discussion.
💬 Comments
What players are saying:
Dude, the part about NOT breaking the wall is gold. I was doing full corner carry combos every time and wondering why I kept losing after the reset. Started leaving them in the corner with a throw instead of a super, and I won like 10 straight matches. The air throw reset trick actually works, but I think you have to do the input a frame earlier than you said. Might be a character hitbox thing.
This is the first guide that actually explains why I keep eating 6Ps when I try to dash in. The 50% Tension rule changed how I play. I used to burn meter on those fancy RC combos and then get bodied by a single counter hit because I had nothing for defense. One thing you missed: the input buffer issue is worse on PlayStation's DPAD. I had to switch to stick just to stop accidental Roman Cancels.
I disagree on Potemkin being a simple grab—he has that slide punch that reaches half screen. But the advice about Garuda pressure loops is 100% correct. I've been doing c.S > Garuda > 5K > Garuda and it's free until Floor 9. Also, the mention of Dragon Ball FighterZ in the guide made me laugh because Strive is basically DBFZ with less supers. Solid read, wish I had this week one.