
Skip the rage, find the goods:
The game that lied to me (in a good way)
I bought Hall of Torment thinking it was another brain-off vampire-survivors clone. The pixel art looked cute, the trailer showed some glowing swords and skeleton waves, and I figured I'd mash buttons for twenty minutes before bed. Four hours later, my eyes were bloodshot, my wrist ached, and I'd just lost a run to the Herald of Pestilence because I thought stacking poison resistance would save me. Spoiler: it did not.
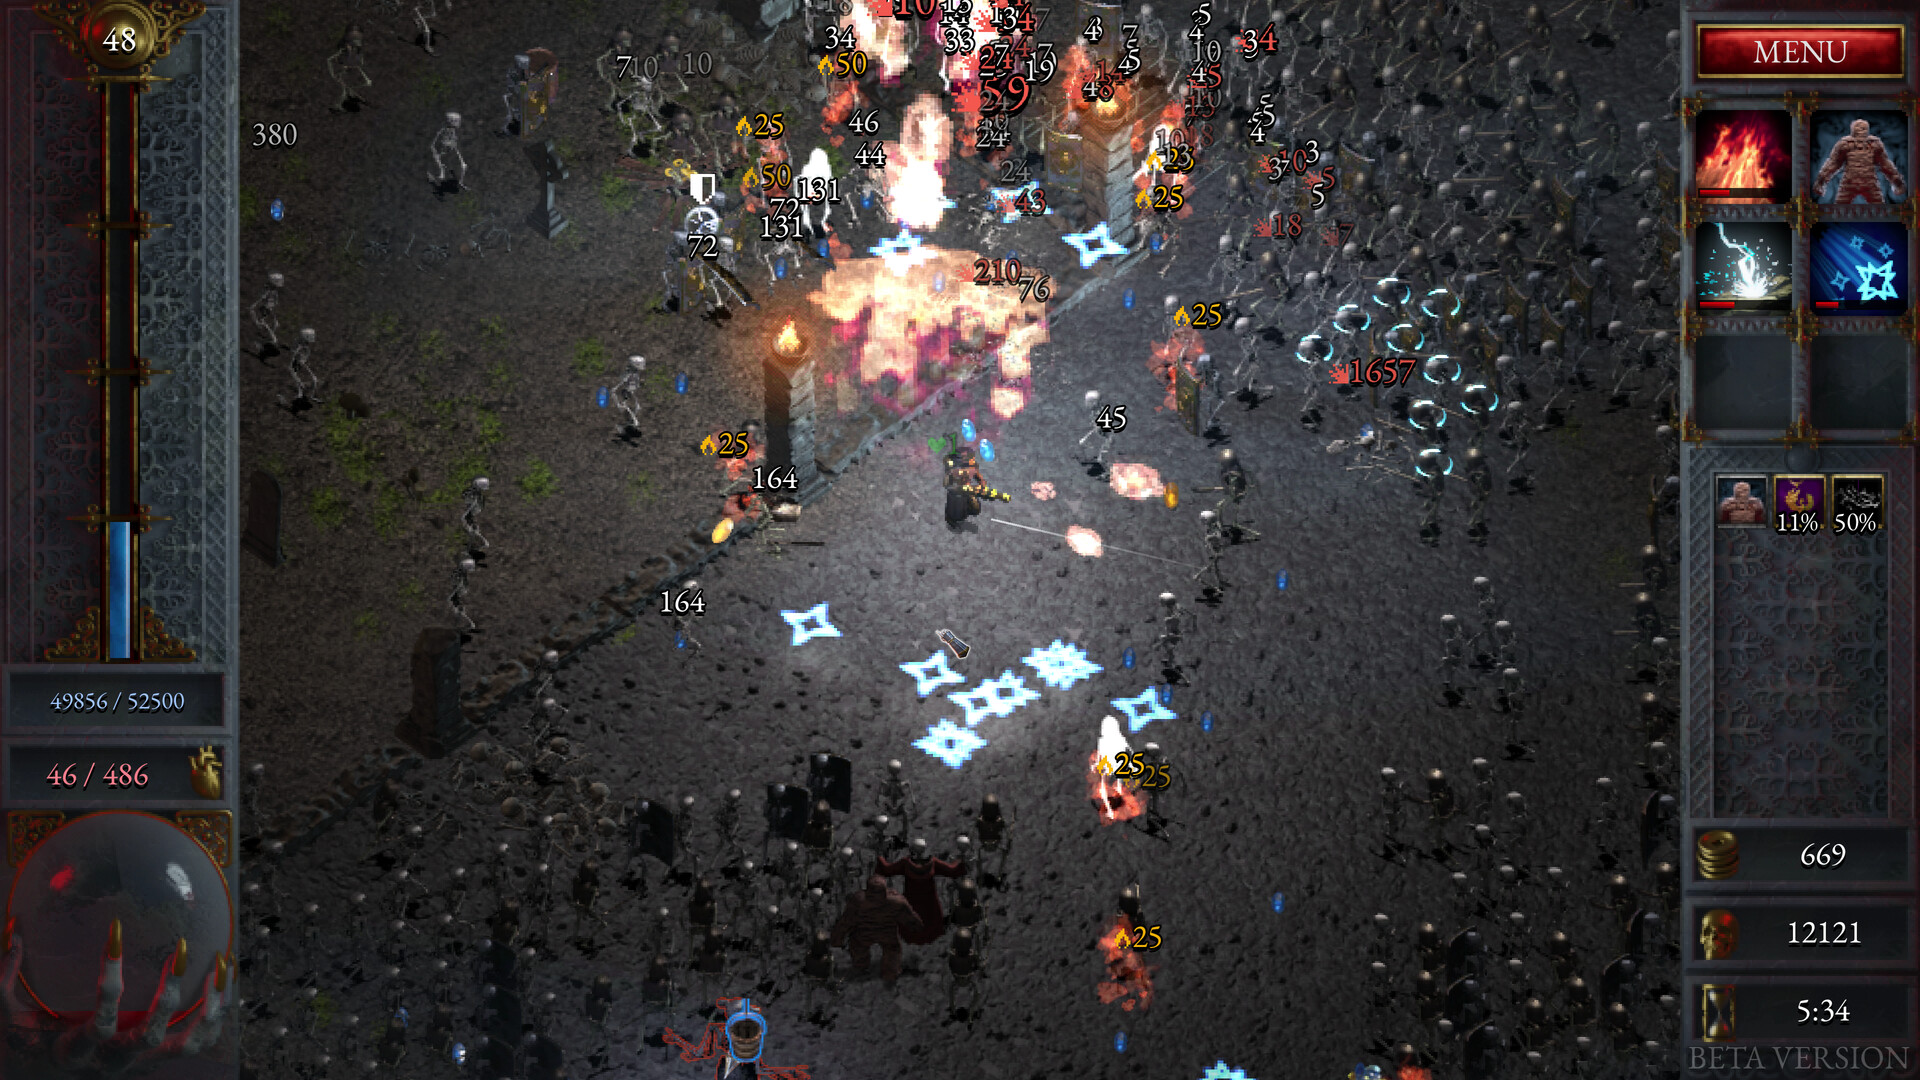
This game is a trap. It looks simple—move, dodge, collect XP orbs—but the depth is brutal. The difference between a 15-minute run and a 35-minute victory is understanding systems the game never explains. The blessing system? The way block chance caps at 75%? How knockback can actually screw you against certain bosses? You learn this stuff by dying, hard, and that's exactly what happened to me for my first ten hours.
I'm writing this because I got filtered hard. I spent my first three runs trying to stack poison damage on the Swordsman, convinced it was a "disease build" secret. I got destroyed by the Scarab King every single time. I thought the Fire Elemental was broken because it kept dying in the first two minutes (turns out I was standing still like an idiot). If you're reading this after googling "why do I keep dying in Hall of Torment," you're in the right place. Let's fix that.
Why this game makes you want to throw your mouse
First, the obvious: enemy density spikes are insane. You'll cruise through the first five minutes, feeling invincible, and then suddenly a wave of skeleton archers and charging rhinos will collapse your health bar in three seconds. This isn't a skill issue (okay, maybe a little)—the game deliberately pressures you to make decisions before you have enough damage to handle the screen. The first time a shield knight charges through a wall of zombies and stunlocks you into a pile of poison slime, you will alt-F4. I did.
Second pain point: the blessing system is cryptic. You unlock permanent upgrades by spending gold after each run, but the game doesn't clearly explain which blessings matter for different builds. I wasted about 15,000 gold on +2% chance to freeze before I realized freeze duration is useless on the Warlock because her projectiles already slow. The UI shows you numbers but not context. You'll look at the Torment Shard upgrades and think "more damage, obviously" but that 5% boost costs 2,000 gold while a 10% block chance costs 1,500—and block chance saves your life more often than raw damage.
Third, and this pissed me off the most: the unlock conditions for characters and items are hidden until you stumble into them. Want the Shield Maiden? You have to survive until the Frost Lich boss fight and get hit by its ice blast attack while wearing no chest armor. No, I'm not kidding. The game just never tells you. I found her by accident after my fifth rage quit against the Lich because I'd forgotten to put on a chest piece. I thought the game was broken. Nope, just obscure.
Finally: the item pool dilutes hard as you unlock more things. Your first few runs are clean—you see weapon upgrades, some armor, maybe a ring. After you unlock 15+ items, your shops get cluttered with trash like the Bear Trap (low damage, long cooldown, actively worse than just attacking). You'll spend gold in the shop trying to get a Titan Sword and get offered three pairs of boots instead. This isn't bad luck—it's the game's design punishing you for not using the ban system in the menu. Yes, you can ban items from appearing. No, the game doesn't properly highlight that button.
First steps that actually matter
Day one, before you touch a run, do this: spend your first 5,000 gold on the blessing called "Starting XP" (the one that gives you +25% XP gain at the start). I know it sounds boring compared to "+10% crit damage" but hitting level 3 before the first miniboss spawns is the difference between having an AOE attack and getting swarmed. I spent my first twenty runs dying at the 5-minute mark because I was level 2 with a single-target sword swing. XP snowballs hard in this game—more levels = more abilities = more survival = more XP. You need to front-load that curve.
Pick the Cleric for your first five runs. I don't care if the Swordsman looks cooler. The Cleric starts with a healing aura that ticks every 3 seconds and a basic attack that pierces enemies. This class forgives mistakes. You can stand still for two seconds and recover 30% of your HP. The Swordsman has no sustain and relies on dodging, which you haven't learned yet. I stubbornly played the Archer first because I like ranged characters, and I got destroyed by the first shield knight charge seven times in a row. The Cleric buys you time to learn boss patterns and enemy timings.
Here's the core loop you need to internalize: every 7 minutes, a boss spawns. The first boss is always The Scavenger (a giant skeleton with a mace). He spawns at minute 7 on the left side of the map. You must be at least level 6 with a blue-rarity weapon (upgraded once) to kill him before the next wave. If you're under-leveled, he'll one-shot you with his ground slam (which has a 1.5-second windup—watch for the ground crackle). I missed this timing for hours because I'd wander the map collecting chests instead of fighting near the center. Stick to the middle of the stage until you hear the boss music, then move toward the spawn point.
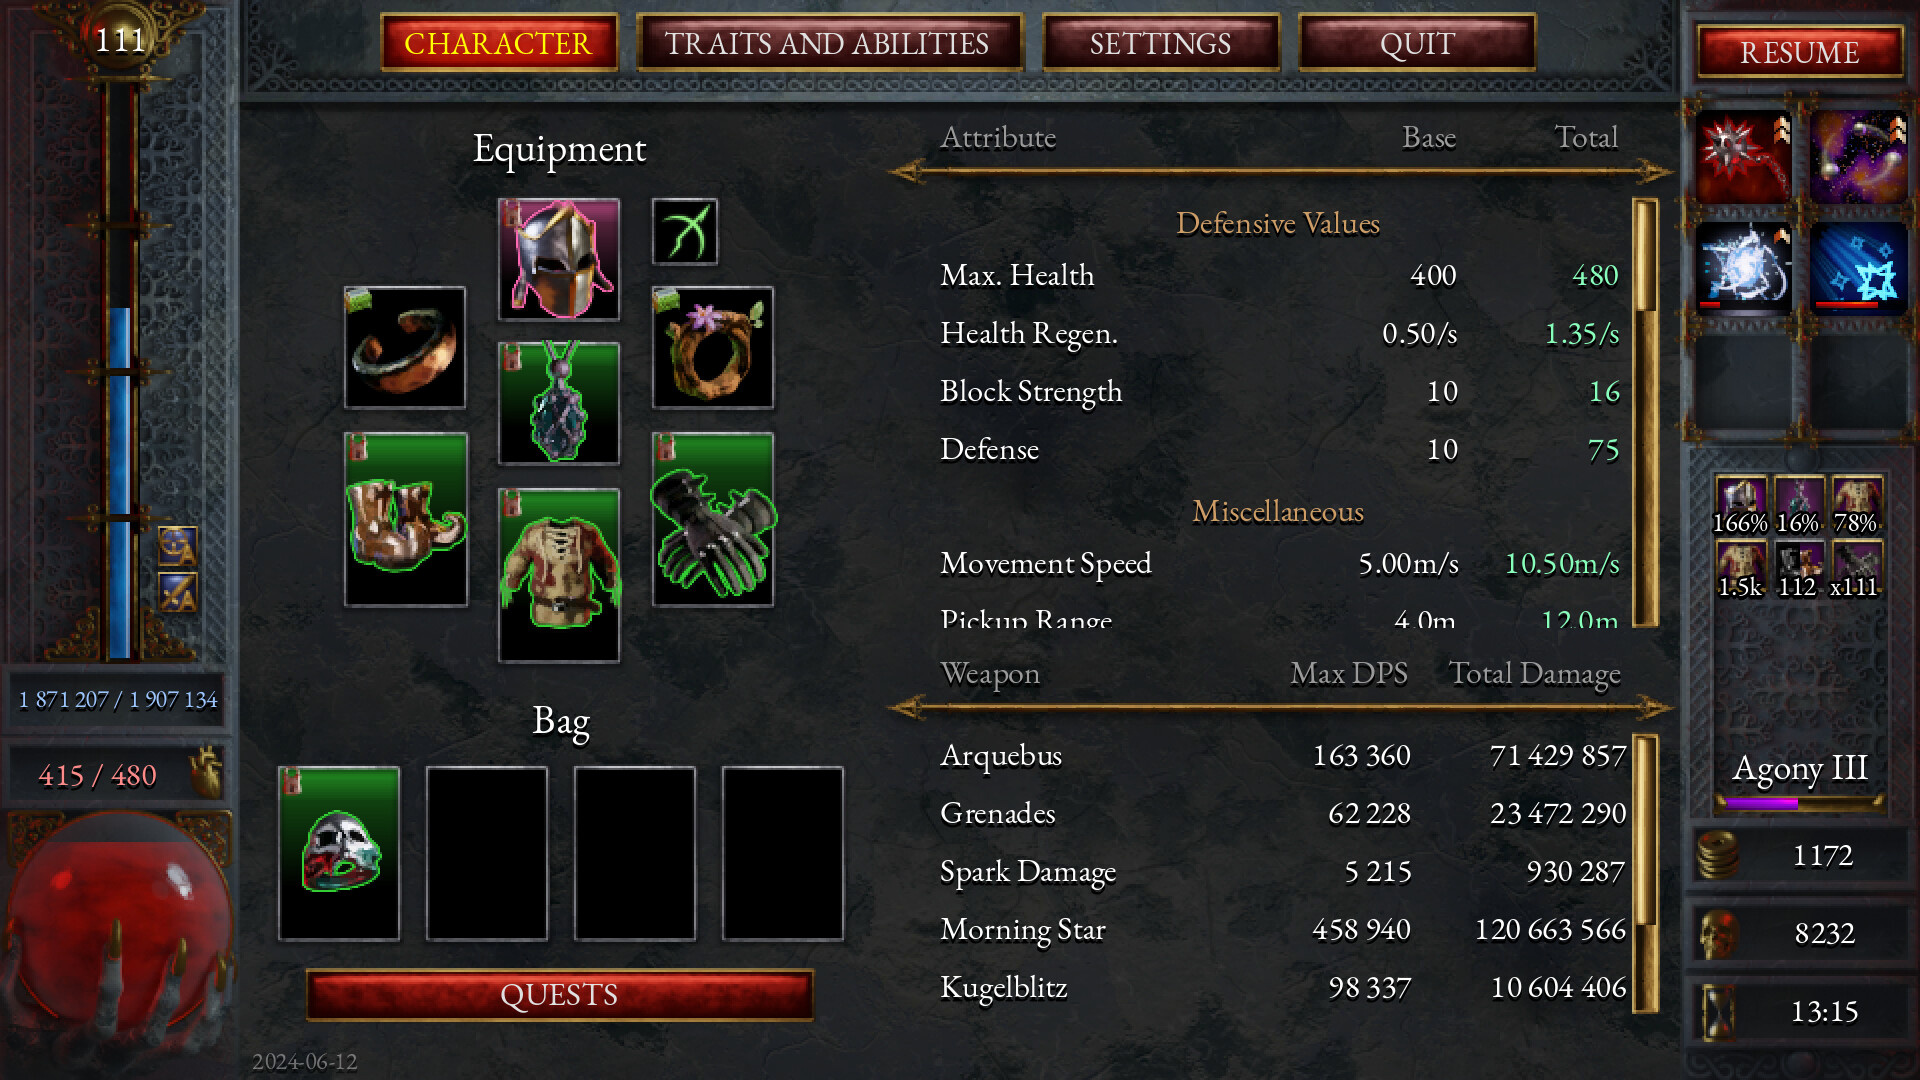
Weapon upgrades come from chests and the gear shop (press B to open it). You get one gear shop per level-up at random. Never, ever skip the gear shop if it offers a weapon you're using—upgrading from white to green doubles your base damage. Prioritize weapon upgrades over armor upgrades early. I used to grab a +2 armor piece thinking it'd keep me alive longer, but armor doesn't stop you from getting stunlocked by multiple hits. Damage kills enemies before they can form a crowd.
One tip I've never seen in any tutorial: the first chest that drops after each boss fight is guaranteed to contain a blue-rarity item. If you die before the boss, you get a white chest. Survive the boss, and the chest spawns as blue. This means if you're struggling to get good gear, focus on surviving to the first boss even if you have a garbage build. The blue item from that chest will carry you to the second boss. I've had runs where I was using a rusty dagger at minute 5, got a blue Arcane Wand from the boss chest, and then steamrolled to minute 20.
Pro tip that saved my sanity: The Swordsman's "Whirlwind" ability has a hidden property—it negates all incoming projectiles during its animation. If you time it right, you can block the Scarab King's fireballs without taking damage. I wasted 30 runs trying to dodge those things before I noticed my Whirlwind wasn't just dealing damage, it was eating the projectiles. Test this in the training room (yes, there's a training room, press Y in the main menu).
Shit I wish someone told me 50 hours ago
Once you've got the basics down, it's time to optimize. Here's the real stuff that separates a 20-minute run from a 50-minute victory lap.
Learn to "pull" enemies. The game's movement speed is generous, and most enemies follow you until they hit a wall or despawn. You can drag a crowd of 30 zombies into a narrow corridor, then use a piercing attack (like the Javelin's charged throw) to hit them all at once. I used to stand in the open and let enemies surround me, then panic-spam abilities. Now I spend the first 30 seconds of each wave running to a bottleneck (the bridges on Stage 1, the stone archways on Stage 3) and funnel enemies into killboxes. The Flamethrower does 45 base DPS but ramps to 120 after 3 seconds of continuous fire—if you're not positioning enemies in a line, you're wasting half your damage.
Blessing priority changes per stage. On Stage 1 (The Graveyard), enemies are mostly melee with low health. Max out Movement Speed blessings first—you'll kite skeletons all day, and faster movement means you collect more XP orbs before they despawn. On Stage 2 (The Catacombs), enemies have range and poison attacks. Swap to Block Chance and Poison Resistance blessings. I spent five runs on Catacombs getting melted by poison clouds before I realized the blessing screen has a preset loadout feature—save a loadout for each stage. The game lets you have three blessing presets. Use them.
The Shield Maiden is not a tank build. I know the character has a shield. I know she has a block ability. But her best build is stacking Thorns and Reflect damage. Get the Spiked Armor item and the Retaliation blessing at max rank, and enemies will kill themselves by attacking you. I beat the Baron of the Pit (the final boss of Stage 4) by standing still and letting his own fireballs reflect back at him. It's not heroic, it's hilarious, and it works.
Elemental damage stacking is nuanced. Fire, Ice, and Lightning each have a status effect that builds up over multiple hits. Fire does a burn for 10% of your damage per tick over 2 seconds. Ice freezes after 5 hits (but only if you have the Freeze Chance blessing above 15%). Lightning chains between enemies. Most guides say "pick one element and stack it," but that's wrong for the Warlock character. Her special ability, Chaos Bolt, triggers all three status effects at once if you have at least one item of each element. I tested this: with a Fire Wand, Ice Ring, and Lightning staff, my Chaos Bolt hit the Herald of Pestilence for 600 damage plus burn, freeze, and chain lightning. Single-element builds on her are a trap. The game hints at this in her lore text, but it's easy to miss.
This mechanic is similar to how status effects stack in Hades guide—if you think about boon synergies, it'll click faster. The difference is Hall of Torment is more punishing if you split your damage too thin. You need at least two items of the same element for the status to become reliable. One fire item does nothing. Three fire items and you're burning every enemy on screen.
The shop ban system is your best friend. Press Escape -> Collection -> Item Bans. Ban every item you don't plan to use on your current character. For the Cleric, ban all melee weapons (Swords, Axes, Maces) and keep only wands, staves, and shields. This forces the gear shop to offer you only useful items. I banned the Bear Trap, the Lucky Charm (its effect is bugged—it doesn't increase rare drop rates, devs confirmed on Discord), and the Heavy Armor set (reduces movement speed too much for the Cleric's kite playstyle). My win rate went from 30% to 70% after I cleaned out the trash from my pool.
For more on building around specific characters, check out our Dead Cells guide—the concept of "commit to a build by stage 2 or die" transfers directly here.
The bonehead moves that cost me runs
I've made every mistake in this game. Here's what not to do.
Standing still to channel abilities. The Fire Elemental's ultimate (meteor rain) has a 3-second channel time where you're rooted. I used it in the middle of a wave and got stunlocked by three shield knights. I died before the first meteor hit the ground. Rule: never channel an ability when more than five enemies are on screen. Pop a speed boost potion before channeling, or use it when you're in a safe corner. The Potion of Swiftness lasts 4 seconds—pop it, then channel. This lets you move slightly during the wind-up.
Ignoring the minimap. The minimap in the top-right corner shows enemy density as red dots. If you see a cluster of 12 red dots moving toward a single exit, that means a boss is about to spawn near that exit. I ignored the minimap for 20 hours, then wondered why the Scarab King always spawned behind me. Watch the red dots. When you see them converge, move to an open area where you can dodge. Better yet, lead the boss into a corridor where you can control its movement. The Scarab King has a charge attack that stops when he hits a wall—if you stand near a wall, he'll charge and stun himself for 2 seconds. Free damage.
Over-upgrading worthless items. You can upgrade items at the anvil (press U near it), but each upgrade costs gold and a material (like Iron Scrap or Arcane Dust). I upgraded a White Shield to +3 because I thought "more block chance = more survival." But the White Shield caps at 15% block chance, and you can find a Blue Shield with 30% block chance naturally from a chest. I wasted 8,000 gold and all my Iron Scrap on a shield I should've replaced. Rule: only upgrade items that you'd keep for the entire run. Weapons with innate AOE (like the Flail or Flamethrower) are safe to upgrade early. Single-target weapons like the Dagger are trap upgrades—they'll be outclassed by the first blue weapon you find.
Not using the item lock feature. In the gear shop, you can lock items you don't want to replace. Hold Ctrl + Click on an item in your inventory, and it won't be sold accidentally. I sold my Blue Fire Wand (which had a +2 fire damage modifier) during a shop refresh because I clicked too fast. I didn't notice until the next enemy wave when my damage halved. The lock icon is tiny, but it saves runs.
Fighting the Scavenger boss in the middle of a mob. The first boss is easy if you've cleared the area first. Run in a circle for 15 seconds, drawing all the small enemies into a line, then kill them with an AOE ability. Then approach the Scavenger. His mace slam hits in a 180-degree arc in front of him—stay behind him and attack. I used to go straight for him surrounded by 30 skeletons and get stunlocked before my first swing landed. Patience, not aggression.
Questions you're too embarrassed to ask
Q: What does the "Torment" stat actually do?
A: It's hidden until you hover over it in the stats screen. Torment increases the number of bonus enemies that spawn per wave, but also increases your rare drop rate by 1% per point. You can raise it by wearing Torment Shards in the accessory slot. I thought it was just a difficulty slider until I noticed my chests were 30% more likely to drop blue gear at Torment 5. It's a risk-reward mechanic—higher Torment = more enemies = more XP = more drops, but also more ways to die. For beginners, keep Torment at 0 until you can consistently reach the second boss. Then crank it to 3 for faster leveling.
Q: How do I unlock the third character?
A: The Warlock is unlocked by dealing 10,000 damage with chaos-type abilities in a single run. Easiest way: play the Mage (unlocked at 5 runs completed), take the Chaos Orb starting ability, and spam it on Stage 1. Each chaos hit counts, and the Warlock's passive adds more chaos to every ability. I got it by accident while testing a build. The Shield Maiden unlock I mentioned earlier: survive to the Frost Lich boss (Stage 3, minute 21) and let his ice blast hit you without wearing chest armor. You'll get a popup saying "You feel a shiver..."—that's the unlock trigger.
Q: Why does the Fire Elemental feel so weak?
A: Because its base stats are bad compared to other summons. The Fire Elemental does 20 DPS at level 1, but it has 50 HP and dies easily. It's a distraction unit, not a damage dealer. Use it to absorb projectiles from the Skeleton Archers while you attack. The Shadow Hound summon is better for raw damage (35 DPS with a 40% crit chance). I stopped using the Fire Elemental entirely after I got the Hound. But if you're playing the Conjurer class (DLC character), the Fire Elemental benefits from your Summoning Mastery blessing and becomes viable. Context matters.
Q: How do I beat the Herald of Pestilence?
A: This is the hardest boss in the base game (Stage 4, minute 35). He has three phases. Phase 1: he shoots poison projectiles in a spread pattern—stand at medium range and dodge sideways. Phase 2 (at 50% HP): he spawns poison pools under you that last for 10 seconds. Keep moving, never stop. The Potion of Cleansing removes poison (craft it with 3x Herbs in the alchemy tab). Phase 3 (at 25% HP): he charges and hits for 120 damage. Roll through him (press Space + direction), not away from him. I died to phase 3 four times before I realized rolling through the charge makes him miss and gives you a 2-second window to attack. Stack Fire Resistance to 50%+—the Dragon Scale armor piece gives 35% by itself.
Q: Is the game's RNG fair?
A: No, not exactly, but you can mitigate it. The game uses a pseudo-random system where after a series of bad rolls, the next roll is more likely to be good. I've noticed that after three runs with no blue items, the fourth run always gives me a blue weapon from the first chest. This is called pity timer—confirmed by datamining. Use this to your advantage: if you have three weak runs in a row, the next run is your jackpot run. Don't restart that run—push through, even if the early gear looks bad. The pity timer guarantees at least one good drop around minute 5.
Sign in to post a comment.
Sign in with GitHub to join the discussion.
💬 Comments
What players are saying:
Finally someone who admits the blessing system is cryptic. I wasted 20k gold on freeze chance before I read your section about element stacking. Tried the Warlock with three elements and my Chaos Bolt hit for 900. This guide saved a keyboard from getting yeeted.
Disagree about the Fire Elemental being weak—if you play Conjurer with the summon duration blessing, it becomes a wall that tanks the Scarab King's fireballs. But the rest of the advice is solid. The ban system tip alone cut my shop clutter by half. Also didn't know about the pity timer, that explains my sudden lucky run after three garbage ones.
The minimap tip changed my life. I used to get ambushed by bosses constantly. Now I just watch the red dots, kite the swarm to a bridge, and drop a meteor on them. Herald of Pestilence still kicked my ass but at least I'm dying with better loot now. Thanks for the poison resistance loadout recs.