Skip to any section:
This Game Will Break You (And That's Okay)
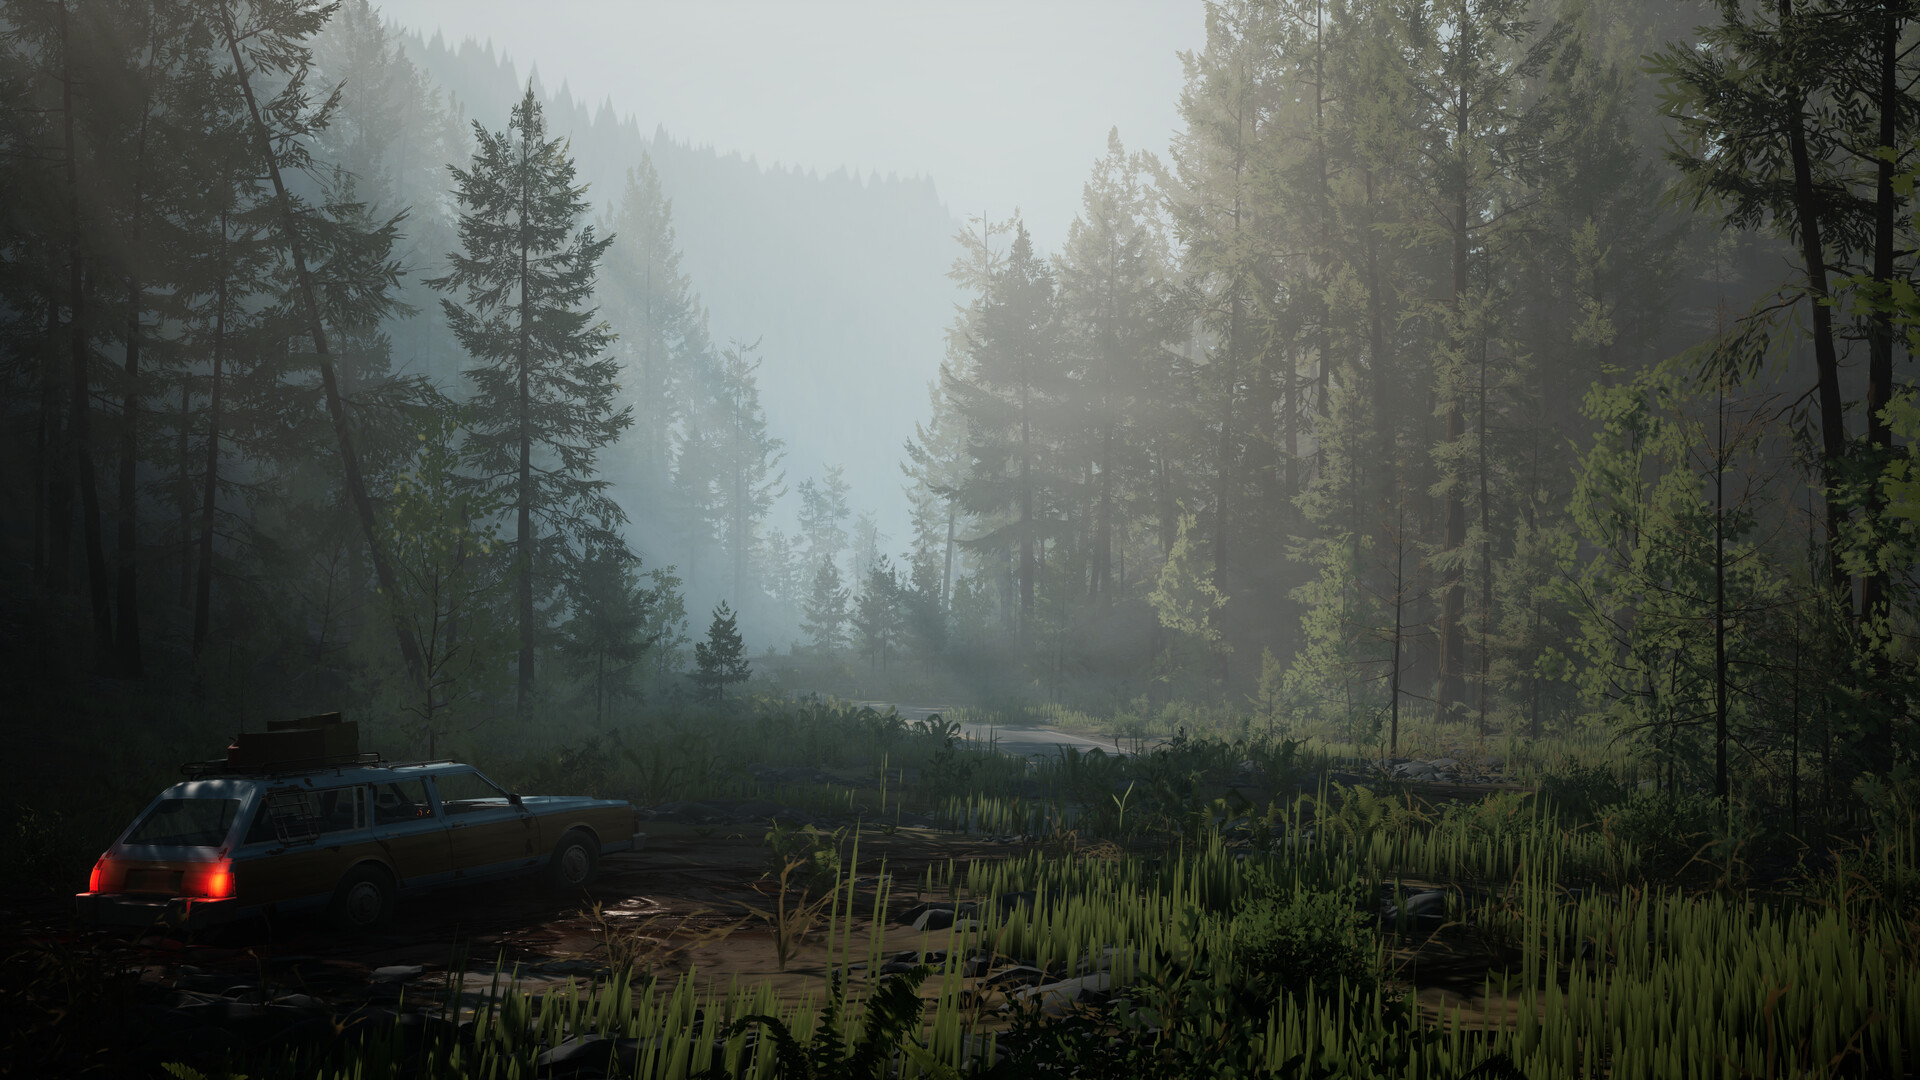
Look, I'm gonna be real with you. I bought Pacific Drive thinking it was a chill driving game with some spooky vibes, and then I spent my first six hours dying to radiation, getting my car's panels ripped off by trees that apparently have a personal grudge against me, and panic-hopping through a storm that sounded like God was chewing gravel. I almost refunded it. I'm glad I didn't.
This game is punishing in a way that modern games just aren't anymore. It doesn't hold your hand. It doesn't care if you're having fun. It gives you a beat-up station wagon, a garage that barely works, and a zone full of physics anomalies that want to crumple your metal ass into a cube. And somehow, it's one of the best survival games I've ever played. The key is understanding that the game isn't fair — it's consistent. Learn the consistency, and you'll be ripping through the Olympic Exclusion Zone like you own the place.
This isn't a guide written by some marketing team. I've got 90 hours in this save file. I've lost three fully-upgraded cars to the deep zone because I got greedy. I've rebuilt from scratch with nothing but a tire and a prayer. I'm writing this so you don't make the same stupid mistakes I did.
Why You're Already Dying And Hating Your Car
Let's talk about the elephant in the room. You started the game, drove out of the garage, and within ten minutes your car was smoking, your tires were gone, and you had no idea what the hell was happening. That's not you being bad at games. That's the game's tutorial being almost criminally vague about what's actually dangerous.
Biggest pain point: The game teaches you how to repair a panel, but it doesn't teach you what actually damages it. Here's the truth — most of your early deaths come from three specific things that the game never explains clearly.
- Bubbling asphalt: If you see the road shimmering or bubbling, get off it right now. That's a Corrosive Zone and it will eat through your tires and undercarriage in about 15 seconds flat. I lost an entire set of Off-Road Tires to this on my second run because I thought it looked pretty.
- Red Sparks: You'll see these little red embers floating around. Ignore them. If they touch your car, they immediately start a fire. Not a little fire — a full chemical burn that spreads faster than you can react. I watched my entire trunk full of loot go up because one pixel of spark landed on my back door.
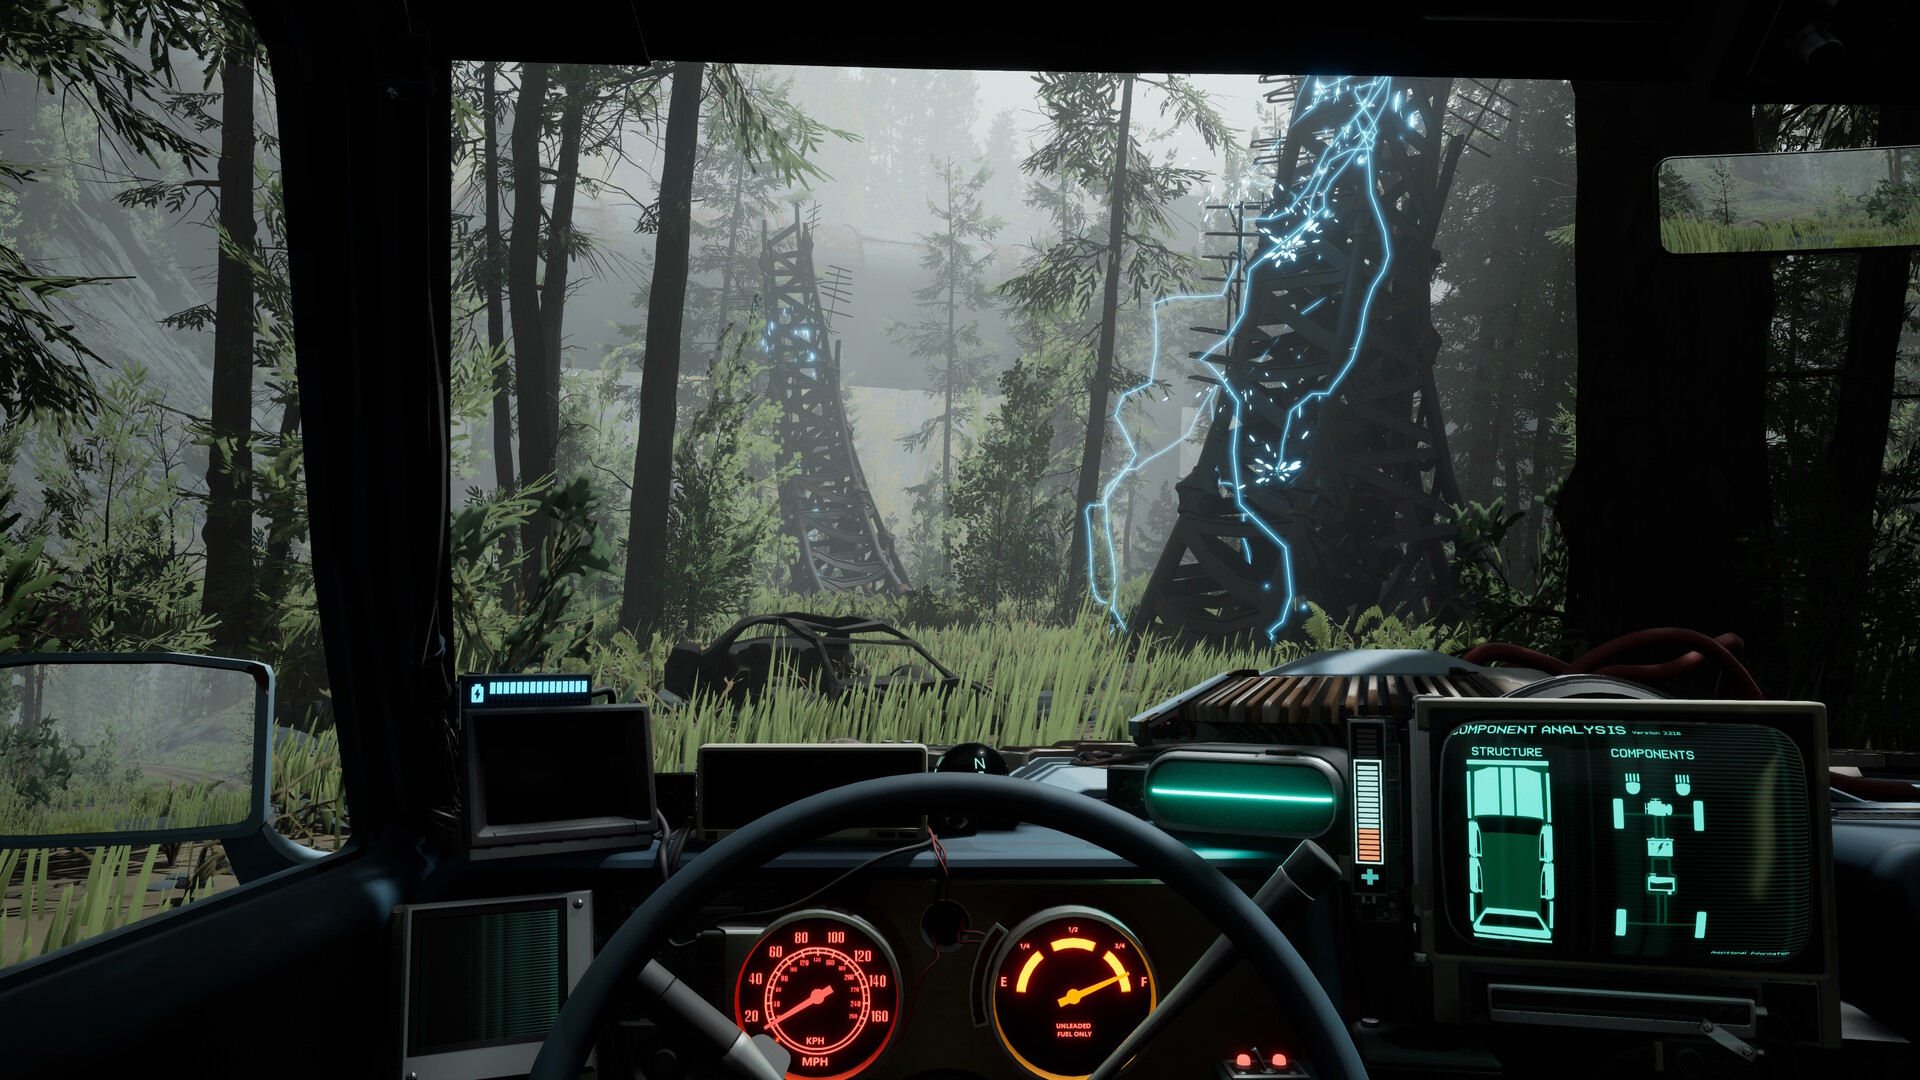
- The "Quiet" Storm: The game tells you about the big red storms. It doesn't tell you about the silent blue one that appears with zero warning. If the air suddenly turns cold and your radio starts crackling, get in the car and drive in the opposite direction of where you were heading. That's a Psychic Storm and it will drain your health through the roof of your car if you're parked.
The second major pain point is inventory management. This game is brutal about inventory. You have a trunk, you have your backpack, and you have your hands. That's it. You will constantly be deciding between grabbing that rare part or leaving it behind because you already have three spare tires. Accept that now. You will always, always wish you had more space.
The First Hour: What The Tutorial Doesn't Tell You
Alright, you've started a new game. You're in the garage. You have a car with a missing door and a dream. Here's what you actually need to do in the first hour to set yourself up for success.
Step one: Scavenge everything in the garage zone. I don't mean just the immediate buildings. Walk around. There's Scrap Metal behind the big shed, Rubber in the old tire pile to the left of the gas station, and Plastic inside the broken vending machine. You should have enough to craft a full set of Basic Repair Tools and two Spare Tires before you even leave the first area. I didn't do this. I left with half a wheel and regretted it.
Step two: Don't rush the first mission. The game pushes you to go to the first junction and scan the objective. Ignore that for a second. Go to the mechanic bench and craft a Handheld Torch. It costs 2 Scrap Metal and 1 Plastic, and it's the single most useful tool in the early game. It lets you cut through metal fences and debris, opening up shortcuts and hidden loot rooms that the game doesn't tell you about. I spent my first four hours running through locked gates before I realized I could just burn them down.
Step three: Learn the "F" button. I'm serious. The default key to pick up items and interact with car parts is F. This sounds obvious, but the game also lets you rip off panels from wrecked cars with this button. If you find a car with a Steel Door or a Reinforced Bumper, you can literally tear it off and attach it to your own car. This is not explained anywhere. I didn't discover this until hour 10. My first five hours were spent with a missing passenger door because I thought you had to find parts as loot drops.
Step four: Budget your fuel. The gas gauge is a liar. It says you have half a tank, but that's only enough for about 2.5 kilometers of off-road driving. The game doesn't show you an exact number, so you need to develop a feel. Here's my rule: if you're more than 500 meters from your extraction point and you have less than half a tank, start heading back. I have lost more loot because I ran out of fuel 200 meters from the exit than I care to admit. You can't refuel in the field unless you find a Gas Station junction, and those are rare. Hoard fuel like it's the apocalypse, because for your car, it is.
Pro tip that saved my entire run: Your car's headlights drain the battery. If you're sitting still in a safe zone (like scanning an objective), turn off the engine AND the headlights. Each minute with the lights on costs you about 3% battery charge, and that battery also powers your Wipers, Radar, and Dashboard. I used to leave my car running while I explored a building, and I'd come back to a dead battery and a storm chasing me. The button is H for lights, X for engine. Use them both like you're paying for the electricity yourself.
Expert Tricks From Someone Who's Lost 40 Hours To This Road
You've got the basics down. You're not dying every run. Now let's talk about how to stop surviving and start thriving. These are the things I figured out the hard way, after my 50th death to a Bunny (yes, that's the actual name of an anomaly — and yes, it's terrifying).
Master the "Crab Walk." This is a technique I accidentally discovered when my front-right tire got ripped off by a Tourist (those floating orb things that follow you). If you lose one tire, the car becomes nearly undrivenable in a straight line. But here's the trick: tap the brakes and turn into the side with the missing tire simultaneously. You'll do a kind of awkward crab shuffle that keeps you moving in a straight line. It's not fast, but it's faster than walking. Once I learned this, I stopped panicking over a single blown tire. You can drive halfway across the map with two tires if you get good at this.
Farming the "Unstable Spire" for rare loot. Every zone has these big, glowing towers called Unstable Spires. They attract anomalies like moths to a flame. Most players avoid them because they're scary. Don't. If you park your car about 50 meters away, you can run up to the base of the spire and grab the Fabricated Components that spawn around it. These are worth 3x the scrap value of normal parts. Grab them, run back to the car, and dip out. The anomalies will swarm the spot where you were standing roughly 10 seconds after you leave. You can farm a full inventory of high-end parts in about two minutes. I farmed enough Carbon Fiber Panels this way to upgrade my entire car in one run. That would have taken me five normal runs otherwise.
The "Medical Station" exploit. This one feels borderline unintended, but it's been in the game for months so I'm pretty sure it's intentional. Med Stations (those white first-aid boxes on walls) respawn their contents every time you leave a junction and come back. They always contain Bandages, Stimulants, and sometimes Antidotes. If you find a junction with three or four Med Stations near each other (like the Old Mill zone), you can fast-travel back to the garage, re-enter the junction, and the Med Stations reset. I did this for about 20 minutes and walked out with 30 Bandages and 12 Stimulants. I haven't had to craft medical supplies since. It's boring, but it's efficient.
Don't sleep on the "Bolt-Tightener." This is a tool you unlock around mid-game. Most people ignore it because it's not a weapon. Big mistake. The Bolt-Tightener lets you repair your car's panels without exiting the driver's seat. You just point, click, and your health bars go up. It uses a bit of durability, but it saves you the 5-10 seconds of getting out, running around, and manually repairing. In a storm, those seconds are the difference between making the exit and getting your car torn apart. I keep mine on the passenger seat at all times.
The "Jackhammer" is overrated. Everyone in the guides section raves about the Jackhammer for breaking rocks and clearing paths. It's fine, but it's heavy and takes up two inventory slots. I replaced mine with the Scrapper — it does less damage per hit but has faster attack speed and weighs half as much. For clearing debris, the Scrapper is better because you can chain hits without the stamina penalty. The Jackhammer hits harder, but you'll be out of breath after two swings. Not worth it for a tool you'll use maybe five times per run.
This is a great time to mention a similar survival game with a brutal learning curve: if you like the "figure it out or die" mentality of Pacific Drive, you'll probably gel with Subnautica. That game also throws you into a beautiful but lethal world with minimal hand-holding. Check out our Subnautica beginner's guide for more tips on surviving the early game when everything wants to eat you.
Five Mistakes That Got Me Killed (And My Car Trashed)
I've made every dumb mistake this game has to offer. I'm listing the five worst ones here so you can avoid them and laugh at me instead of crying with me.
- Mistake #1: Trying to outrun the storm. The storm is faster than you. I don't care if you have a fully upgraded Race Engine and Nitrous Boost. The storm accelerates faster than you can. I tried this in the Mid-Zone and watched my health bar drain while I was doing 120 km/h. The storm catches you in about 20 seconds flat. The solution is to drive perpendicular to the storm's edge and find a safe house or a garage exit. You can't outrun it, but you can dodge sideways and let it pass.
- Mistake #2: Loading the trunk with loot before reinforcing the side panels. The trunk is the most exposed part of your car. The rear panels take damage from road debris, tree branches, and anomaly hits that you literally can't see coming from the driver's seat. I loaded my trunk with 20 units of Scrap Metal, drove over a bump, and the back panel fell off. All my loot spilled onto the road. I spent 10 minutes chasing scrap down a hill while a storm was forming. Upgrade your rear bumper and side panels to Steel before you put anything valuable in the trunk. I learned this lesson the worst way possible.
- Mistake #3: Ignoring the "Abandoned Car" traps. You see a wrecked car on the side of the road with a glowing trunk. You think "free loot!" You walk up to it, press F, and a Spitter (a turret-like anomaly) pops out of the car and shoots you in the face. I died to this three separate times before I learned. The rule is simple: if the car is sitting in a puddle of purple goo or has sparks coming from the engine, don't touch it. Shoot the car with your torch first from a distance. If it explodes or a turret pops out, you've saved yourself a trip to the death screen.
- Mistake #4: Not carrying a second battery. Your car has one battery slot by default. It's a Lead-Acid Battery with about 200 charge units. That's enough for maybe one long run if you're careful. I learned to carry a spare battery in the trunk (you can craft them with 2 Plastic and 1 Copper). When your primary battery dies at the worst possible moment (which it will, because this game has terrible timing), you can pull over, pop the hood, and swap in the fresh battery in about 3 seconds. I've made it to extraction with zero battery charge three times because I had a spare. It's the cheapest insurance policy in the game.
- Mistake #5: Over-revving the engine in deep mud. The game has mud physics that can genuinely ruin a run. If you hit a patch of deep mud (you'll know it because your wheels spin and your speed drops to 5 km/h), your instinct is to floor the gas. Don't. That burns fuel and overheats your engine. The correct move is to let off the gas completely, tap the brake once, and then accelerate slowly (about 30% throttle). Your tires will find grip and you'll glide out of the mud using about half the fuel. I spent my first ten runs flooring it through mud and wondering why I ran out of gas a kilometer later.
These mistakes are the ones I see new players make in the Reddit threads every single day. Avoid these, and you'll save yourself about ten hours of frustration.
The Questions Everyone Asks In The Discord
I've pulled these from the top posts on the Pacific Drive subreddit and the official Discord. These are the questions that come up every single day.
Q: Can I repair my car's panels while driving?
A: Not without the Bolt-Tightener tool, which you unlock from the Mid-Zone Shed quest. Before that, no. You have to pull over, get out, and manually use the Repair Tool on each panel. It's annoying, but it's what we've got. I keep the Repair Tool in my quickbar slot at all times.
Q: What's the best early-game car upgrade?
A: Off-Road Tires by a mile. The default tires have terrible traction on dirt and mud, which is basically every surface in this game. Off-Road Tires cost 4 Rubber and 2 Scrap Metal and they increase your off-road grip by about 40%. You'll be able to climb hills that would leave default tires spinning. Get these before any engine upgrade. A fast car that can't grip a slope is useless.
Q: How do I unlock new car parts like the Roof Rack?
A: You find blueprints in the world. They're usually sitting on workbenches inside abandoned workshops or garages in the zones. The Roof Rack blueprint is specifically in the Smith Brothers Auto junction, on the second floor of the main building. You have to climb the broken stairs. Most people miss it because they don't look up. I found it by accident while hiding from an anomaly.
Q: Why does my car keep catching on fire?
A: You're either driving through Corrosive Zones (burning asphalt), hitting Red Sparks (floating embers), or your engine is overheating from too much sustained boost. Check your engine temperature on the dashboard — if it's in the red, let off the gas and coast for 10-15 seconds. Also, don't install a Race Radiator without a Cooling Fan attached. I did that and my engine caught fire after 30 seconds of normal driving. The cooling system in this game is not optional.
Q: Is there permadeath?
A: No. When you die, you lose whatever loot was in your backpack (not your trunk). Your car stays in the zone and you have to go back and recover it. If you die again before recovering the car, you lose all upgrades on the car. It's not permadeath, but it's punishing enough that you'll treat every death seriously. I've lost two fully-upgraded cars this way. It hurts.
Q: What's the best way to deal with the "Bunnies"?
A: The Bunny is that hopping, glowing thing that leaves a trail of fire. It's annoying, but it's actually one of the easier anomalies to deal with. It moves in a straight line when it hops. Wait for the hop, then drive perpendicular to its path. It can't turn mid-hop. You can dodge it 100% of the time if you just watch the timing. I used to panic and swerve wildly. Now I just tap the brakes, let it jump over me, and drive past. Easy.
If you're struggling with similar survival mechanics that punish you for not reading the game's mind, you might also enjoy Green Hell. That game's sanity system is even less forgiving — check out our Green Hell survival tips for advice on not losing your mind while fighting the jungle.
Sign in to post a comment.
Sign in with GitHub to join the discussion.
💬 Comments
What players are saying:
Finally someone who admits the tutorial is garbage. I spent TWO HOURS trying to figure out why my car kept catching fire. That tip about the Race Radiator without a Cooling Fan literally saved my run. I had that exact setup and wondered why I was a rolling bonfire. Thank you, whoever wrote this.
I disagree on the Jackhammer being overrated. I use it to break through the thick rock walls in the Deep Zone and the extra damage is worth the weight for me. But the Crab Walk tip is legit — I lost a front tire in the Mid-Zone last night and that technique got me home with a trunk full of Fabricated Components. Solid guide overall, just wanted to offer a different perspective on the tool choice.
The Med Station exploit is the kind of cheese I live for. I spent an hour farming bandages and now I have like 40 in a crate at the garage. I feel like a drug lord. Also the tip about ripping panels off wrecked cars is huge — I'm on hour 20 and I had no idea you could do that. This guide needs to be stickied in the subreddit.