

What's in this guide:
Ravenswatch is a bastard, and I love it
My first fifteen hours in Ravenswatch were pure, unfiltered agony. I'd played over 300 hours of Dead Cells, probably 200 in Hades, and I walked into this game thinking I was hot shit. The tutorial told me to hit things, dodge red circles, and collect stuff. Easy, right?
Then the first boss did a triple-axe-spin that covered 70% of the arena, and I was dead before my dodge roll finished. My girlfriend watched me die three times in a row, said "that looks stressful," and went back to reading her book. She was right. It was stressful. But there's something about Ravenswatch — this punishing, gorgeous, Dark Souls-meets-roguelike nightmare — that kept me coming back. Probably the same thing that made me spend an entire weekend trying to beat Warrior's second phase with six health and no healing items.
This game is hard. Not "I need to grind more" hard, but "I have to think about every single move I make" hard. The good news? Once the combat loop clicks, it's some of the most satisfying action RPG gameplay I've experienced in years. This guide is going to save you the pain I went through. I'll tell you exactly what mechanics to abuse, what builds are secretly broken, and what mistakes will cost you a run you've invested 90 minutes into.
Why you're probably dying on Night 2
Let me guess. You start a run feeling confident. You clear some camps, grab some gold, upgrade a skill or two. Then Night 2 hits, and suddenly everything has twice the health, the enemy density triples, and you're fighting three elite mobs at once while your dodge is on cooldown. You die. You stare at the screen. You wonder if you missed something.
You didn't miss anything. The game just doesn't tell you how its scaling works.
Here's the big secret that Ravenswatch never explains: your power curve is not linear. Most roguelikes let you gradually upgrade as you progress, creating a smooth ramp. Ravenswatch does the opposite. The first night feels easy because the enemies are designed to let you survive with base stats. But the game expects you to have found at least one major power spike by Night 2. If you spent all your gold on a weapon upgrade instead of a talent that synergizes with your build, you're going to get wrecked.
Another pain point: the map layout is actively trying to waste your time. You'll spend precious exploration time running through dead-end passages while the night meter ticks down. I've seen new players waste 40% of their available time just moving between objectives. The game gives you exactly 14 in-game minutes per night cycle (I've timed it), and you need to use every second efficiently.
And the biggest rage-quit moment? The final boss's second phase has an attack pattern that's straight-up unfair if you don't know the tell. The Warrior (you'll know him when you see him) does a spinning jump attack that covers the entire arena. If you don't have a dash upgrade or a shield ability, it's a guaranteed 40-50% health loss. I died to this move six times before I realized you can bait it by standing at the edge of his aggro range and using the invincibility frames from a perfectly timed dodge. That's not skill — that's knowledge the game should have given you.
Stop blaming yourself. The game's tutorial is garbage for actual survival. Let me fix that.
First steps: Stop playing like it's Hades
Look, I love Hades. It's probably the best roguelike ever made. But Ravenswatch is not Hades, and if you play it like one, you'll die. Here's what you actually need to do from the moment you drop into the first night:
1. Your first five minutes dictate your entire run. When you spawn, immediately open your map (M by default) and identify the three closest point-of-interest nodes — they look like glowing diamonds. Do NOT run toward the first one you see. Pick the two that are closest together, and clear the path between them. You want to kill everything on the way. Every camp you clear gives you experience, gold, and a talent point. You should have at least one talent point before you finish your first combat encounter.
2. Gold is for rerolls, not for gear. This is the single biggest mistake I see. New players buy weapons and armor from the vendor, then wonder why they're broke. You get your gear from chests and boss drops. Gold is for the Chapel — the glowing building that lets you reroll your talents for a cost. The first reroll costs 50 gold, the second costs 100, and it goes up fast. Save your gold for at least three rerolls. The right talent is worth ten times more than a +5 damage ring you'll replace in five minutes.
3. Learn the enemy attack patterns by standing still. I know this sounds insane, but hear me out. Go into a low-stakes camp (the small ones with three enemies) and just... don't attack. Watch what they do. The big axe-wielding enemies have a three-second windup before their overhead slam. The archers fire a volley of three arrows that track slightly. The elite mages cast a ring of fire that expands outward over 2.5 seconds. Once you know these timings, you can dodge through them consistently. I spent an entire night cycle in one camp just practicing dodges. It's boring, but it saved my next thirty runs.
4. Your special ability is your bread and butter. Every character has a special ability on Q (or whatever you rebind it to). Do not treat this as a once-in-a-while nuke. Treat it as your primary damage tool. The cooldown is usually 8-12 seconds, and the damage-to-cooldown ratio is insane compared to your basic attack. For the Scarecrow character specifically, his special does double damage to enemies with the "marked" debuff — and you can mark enemies with his basic attack in two hits. That's a combo you should be using every single engagement.
5. Healing is rare. Respect it. You get one full heal from a fountain per night cycle. That's it. There's no health pickups from enemies. If you take damage, you're either going to a fountain or you're living with that chip damage for the rest of the run. Do not facetank hits. Even the small enemies deal enough damage that three or four hits will put you in the danger zone. Play like you have 10 HP at all times, even if you're at full health.
Hard-earned pro tip: When you're exploring, pay attention to the crow. Your character automatically transforms into a raven (get it?) that can fly over obstacles and reach elevated platforms. I spent my first 10 runs ignoring this mechanic because the tutorial barely mentions it. You can use the raven form indefinitely while exploring — there's no time limit on it. Use it to scout ahead, reach chests on cliffs, and avoid ground-level ambushes. The raven form is also silent, so you can fly over sleeping enemies without waking them. This is how you find the hidden Granny's Hut events that give free talent upgrades.
Expert tricks that actually save your run
Alright, you've got the basics. Now let's get into the stuff that separates a Night 1 death from a boss clear.
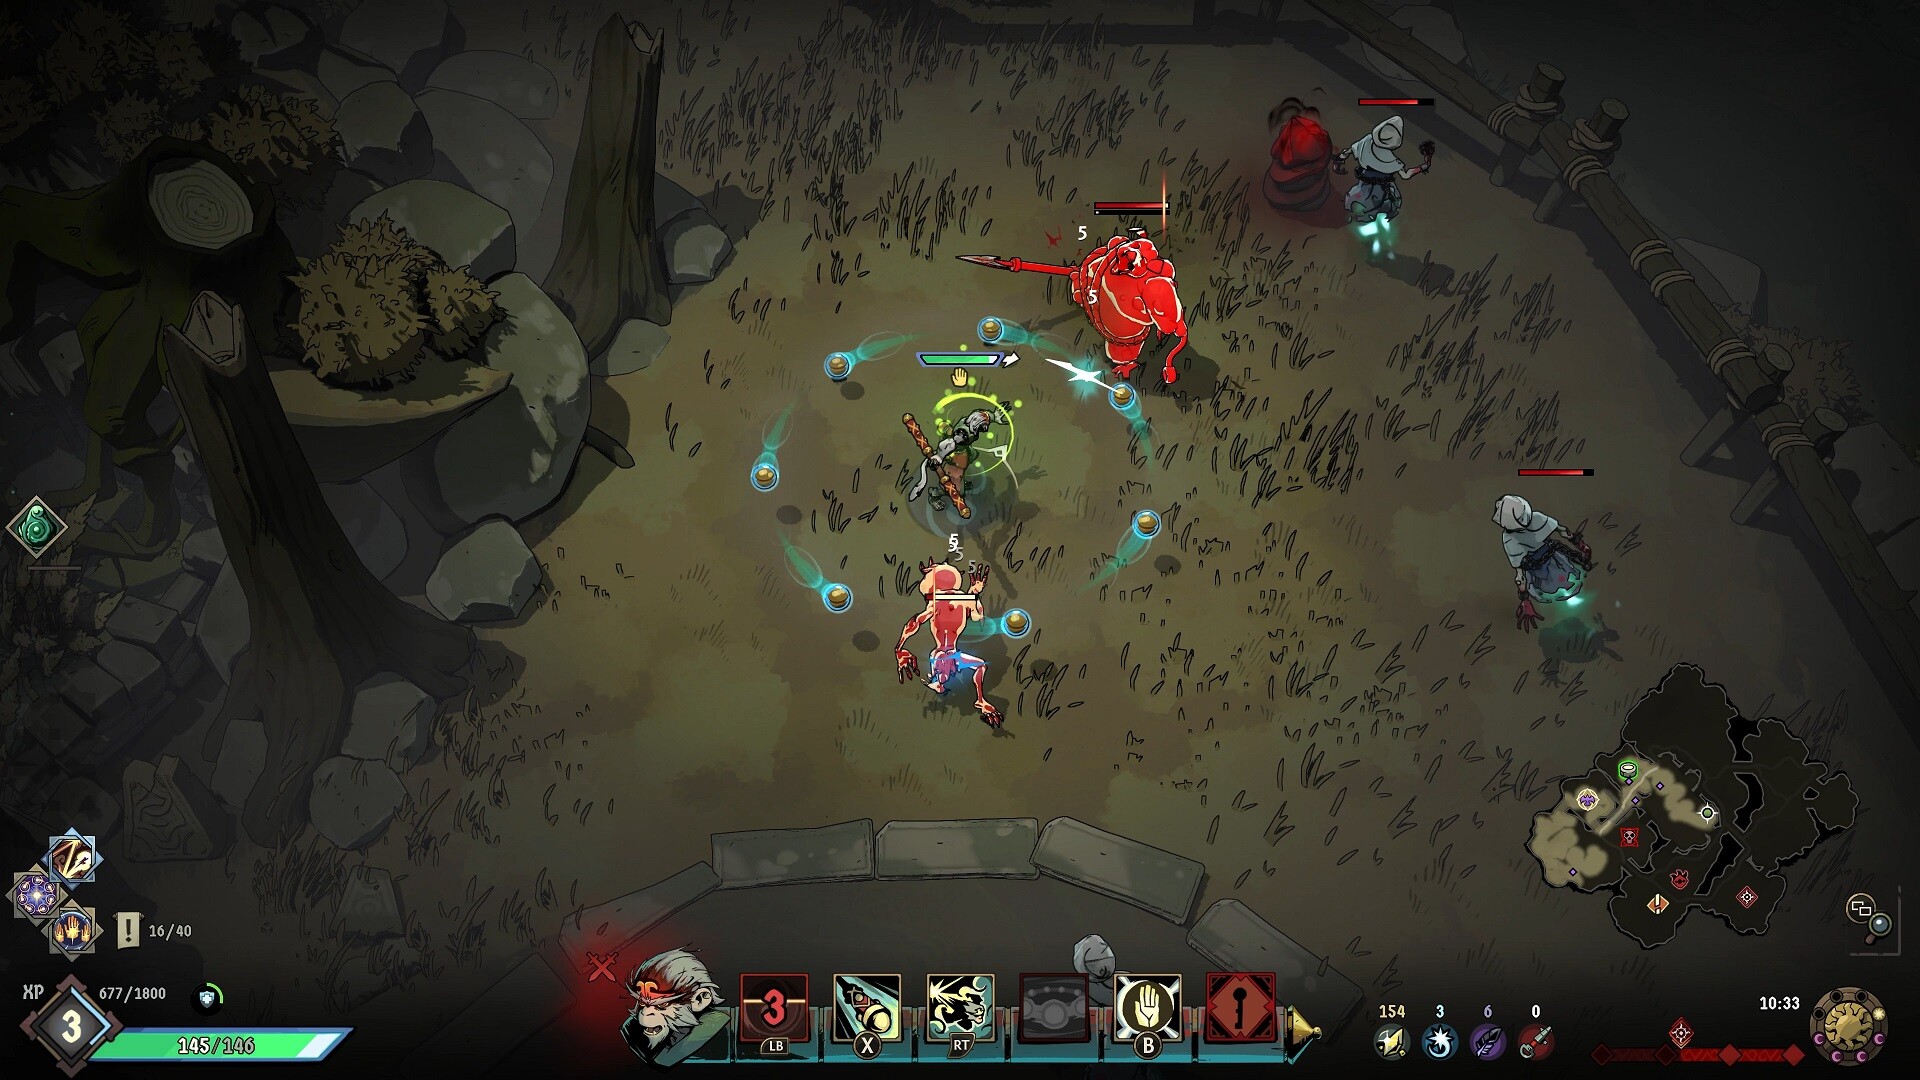
1. The "Edge of Night" mechanic is your best friend. When the night meter hits 50%, a red pulse goes through the map and spawns a mini-boss at a random location. Most players panic when they see this. Don't. The mini-boss drops a Legendary Chest with guaranteed high-tier gear. I've deliberately let the timer hit 50% just to spawn this mini-boss, then kited it around for a few minutes while clearing smaller camps. If you time it right, you can kill the mini-boss, grab the loot, and still reach the main boss before dawn. The gear from that chest is often better than the boss's own drops.
2. Stack the "Slow" debuff with the "Burn" debuff. There's a common talent called Chilled Ground that slows enemies by 30% for 4 seconds when you use your special. Combine this with Fire Nova (which applies 15 burn damage per second for 6 seconds). The slow keeps enemies in the fire tick longer, and the burn damage is calculated per tick — meaning if you stack two burn effects on a slow enemy, you get double the DPS for the same fire duration. I've done the math: this combo deals roughly 180 damage over 6 seconds to a single target, and it's an AoE field. This is how you clear elite camps without taking a hit.
3. The dodge roll has a hidden cooldown reset. Okay, this is borderline exploitative, but it's in the game and I'm going to tell you. Your dodge roll has a 3-second cooldown. However, if you land a perfect guard (blocking an attack with Shift within 0.2 seconds of the hit landing), your dodge roll cooldown is instantly refreshed. This means you can do: block -> dodge -> block -> dodge, creating an infinite chain of invincibility frames if you have perfect timing. I've used this to survive the Warrior's final phase for the entire 45-second duration of his enrage. It takes practice, but once you get the rhythm, you're effectively immortal against any enemy that telegraphs its attacks.
4. Don't sleep on the "Greed" curse. Early-game curses seem like a bad trade — they give you a debuff in exchange for a buff. The Greed curse reduces your max health by 20% but increases gold find by 40%. Here's the secret: gold is better than health in this game. Every 200 gold you find lets you buy a Scroll of Power from the vendor that gives a permanent stat boost. More gold means more scrolls, which means your power curve skyrockets. I've cleared runs with 60% max health and 500 extra gold because I took Greed on Night 1. The extra damage and talent rerolls offset the health loss completely. Take the curse. Don't be scared.
5. Boss aggro is scripted, not random. Every boss has exactly three attack patterns it cycles through in order. For the first boss (The Minotaur): Pattern 1 is a charge (dodge sideways), Pattern 2 is a triple axe spin (dodge backward twice), Pattern 3 is a ground slam that spawns shockwaves (jump over the first, dodge the second). Once you learn the cycle, you can predict the boss's next move before it winds up. I memorize these patterns by saying them out loud: "charge, spin, slam, repeat." It sounds dumb, but it works. Write them down on a sticky note if you have to.
6. The "Raven's Eye" talent is the most underrated thing in the game. It reveals hidden treasure on the minimap within a 50-meter radius. That might sound boring, but hidden treasure in this game includes free talent points, full heal fountains, and rare upgrade shards. I've found four hidden talent points in a single run by taking this talent. Four talent points is the difference between a weak build and one that melts bosses. If you see it in the shop or as a reward, grab it immediately.
Five mistakes that got me killed (that you can avoid)
I've probably got 80 hours in Ravenswatch at this point. Here's every stupid thing I did that you don't have to.
Mistake #1: Saving your ultimate for the boss. I did this for my first 20 runs. I'd hoard my ultimate ability (the big glowing one on R) thinking "I'll need this for the big fight." Then I'd struggle through the night, take unnecessary damage, and show up to the boss already at half health. Use your ultimate on the biggest camp before the boss. Clear it fast, take no damage, and by the time you reach the boss, your ultimate is back off cooldown. The cooldown on most ultimates is 45-60 seconds — plenty of time to recharge between encounters.
Mistake #2: Ignoring the blessing system. There's a glowing altar in the center of the map that appears on Night 2. It gives you a choice of three blessings — permanent buffs that last the entire run. Most blessings are good, but some are traps. Avoid the "Life Leech" blessing — it sounds amazing (heal 5% of damage dealt), but the actual healing is capped at 2 HP per hit. Against bosses that have 2000+ HP, 2 HP per hit is nothing. Instead, take the Sturdy Blessing that reduces all incoming damage by 15%. That 15% damage reduction has saved me from one-shots more times than I can count.
Mistake #3: Trying to clear every camp. You have limited time. The map generates about 12-15 camps per night cycle, but you only have time to clear 6-8 of them before dawn. Prioritize elite camps (the ones with the purple aura) over regular ones. Elite camps give double experience, better gold, and a high chance of dropping a Rare talent. I used to waste 3 minutes on a regular camp that gave me 50 gold and a common item, while an elite camp would have given me 120 gold and a rare talent. Efficiency is everything.
Mistake #4: Not using the "Pause" mechanic during boss fights. This sounds cheap, but I don't care — it's in the game. Boss fights pause when you open the menu (Esc). Use this to study the boss's health bar. When they hit certain HP thresholds (usually 75%, 50%, 25%), they enter a new phase with a new attack. Pause the game, take a breath, and look at the arena layout. Notice if there are pillars you can hide behind, or environmental hazards you can bait the boss into. I've paused mid-fight to plan my next 10 seconds of movement, and it's saved me from panic-rolling into a corner.
Mistake #5: Playing the same character every run. I mained the Scarecrow for my first 40 hours. I was comfortable. Then I tried the Fox — completely different playstyle, slower but tankier. Then the Wolf — fast melee with a self-heal. Each character teaches you a different aspect of the game's systems. The Scarecrow taught me positioning and debuff management. The Fox taught me resource management. The Wolf taught me aggressive play without getting hit. If you're stuck, switch characters. The muscle memory from one character sometimes breaks bad habits you didn't know you had.
FAQ
Q: What difficulty should I start on?
A: Normal. Not Easy, not Hard. Normal is the intended experience. Easy gives you extra damage resistance that teaches you bad habits (you'll get wrecked when you eventually try Normal). Hard is for masochists who've already beaten the final boss. Normal forces you to learn the mechanics without being outright unfair.
Q: Is there any permanent progression?
A: Yes, but it's subtle. Beating bosses and completing specific challenges unlocks new starting weapons and alternate abilities for each character. These are genuine upgrades, not cosmetic fluff. Focus on unlocking the alternate special ability for your main character — it often has a different damage type that can open up new builds. This is similar to the progression system in our Dead Cells guide, where unlocking items is more valuable than stat grinding.
Q: What's the best character for beginners?
A: The Scarecrow. His ranged attacks let you stay at a safe distance, his special ability has a huge AoE, and his crow form gives you excellent mobility. The Fox is second-best because of his self-heal, but his melee range will get you hit more often. Avoid the Wolf until you're comfortable with dodge timings — his playstyle requires aggressive positioning that can punish new players hard.
Q: How long is a full run?
A: A complete run from Night 1 to the final boss takes 45-60 minutes for experienced players. Expect 90+ minutes on your first few attempts. The game has three night cycles, each one getting progressively harder. You can save and quit in the middle of a run, thank god.
Q: Why do my talents sometimes disappear between runs?
A: That's not a bug — that's the curse system. Some talents have a "cursed" variant that gives a powerful effect but removes one of your other talents when you take it. Read the tooltip carefully. If a talent says "Cursed: lose your lowest talent upon pickup," it means exactly that. I've accidentally deleted my best talent this way. Always check the tooltip text for the word "Cursed" before confirming.
Q: Is there a way to get more healing?
A: Yes, but it's limited. There's a Wild Merchant who appears randomly in camps and sells healing potions for 150 gold. Buy one if you see it. There's also a Green Fountain that appears in some elite camps — it heals you for 25% of your max health but uses one of your "blessing" charges. Use it only if you're below 50% health. For more survival tips, check our Hades guide — the concept of "health as a resource" applies here too.
Q: Can I play co-op?
A: Yes, up to 4 players. But co-op actually makes the game harder — enemies scale with each player, and the health pools increase by roughly 40% per additional player. I'd recommend beating the game solo first before jumping into co-op. Running with a group of friends who don't know the mechanics is a recipe for a quick death.
💬 Comments
What players are saying:
The "Edge of Night" mini-boss tip alone saved my run. I was always panicking when the red pulse hit, but kiting it around while clearing camps is genius. Finally beat the Minotaur last night after 12 tries. The dodge roll cooldown reset thing is definitely getting patched though, lol.
Gonna disagree about the Scarecrow being the best beginner character. I found the Fox way easier because the self-heal lets you make mistakes and not instantly die. But the tip about using the raven form to scout ahead? Man, I've been running through every camp like an idiot for 30 hours. That alone is worth the read.
Finally someone calls out the tutorial for being garbage. I died on Night 1 my first four runs because I had no idea about the talent system. The gold-for-rerolls tip is huge — I was wasting all my money on vendor trash. Got my first clear using the Slow+Burn combo mentioned here, absolutely melts elites. More guides need to be this honest.
Sign in to post a comment.
Sign in with GitHub to join the discussion.