
I’ve Got 400 Hours in This Game and I’m Still Learning
I bought Tactical Breach Wizards on a whim during a Steam sale, expecting some janky indie tactics game. Three weeks later, I’d skipped meals, lost sleep, and texted my friend at 2 AM to scream about a combo I accidentally discovered. This game is not perfect — the UI is cluttered, the tutorial skips some critical details, and there’s a difficulty spike around mission 5 that made me alt-F4 twice. But if you push through the rough edges, you’ll find one of the most rewarding tactical experiences out there. I’m writing this because I spent my first 20 hours making every mistake in the book, and I don’t want you to suffer the same way.
This isn’t a review. This is me, a greasy veteran, telling you what the game doesn’t tell you. I’ll share the specific builds that carried me through the hardest encounters, the placement tricks that turned impossible fights into cakewalks, and the one mechanic I ignored for 100 hours that would have saved me endless frustration. If you’re stuck on a mission right now, take a breath and read this. Then go back and wreck them.
Why Players Struggle — The Stuff Nobody Warns You About
Let’s be real for a second. Tactical Breach Wizards is a tactics game that looks like a puzzle game, and that mismatch tripped me up hard. You see the grid, you see the abilities, and you think “okay, I need to find the one perfect sequence of moves.” That’s a trap. Here’s the actual sources of pain I see in every Steam discussion and Discord channel:
- The Timer Pressure. Several missions have turn limits that feel brutally tight on your first attempt. I failed the third mission four times because I tried to loot every corner. You don’t need to kill every enemy or open every container. The timer is your real enemy, not the guys with guns.
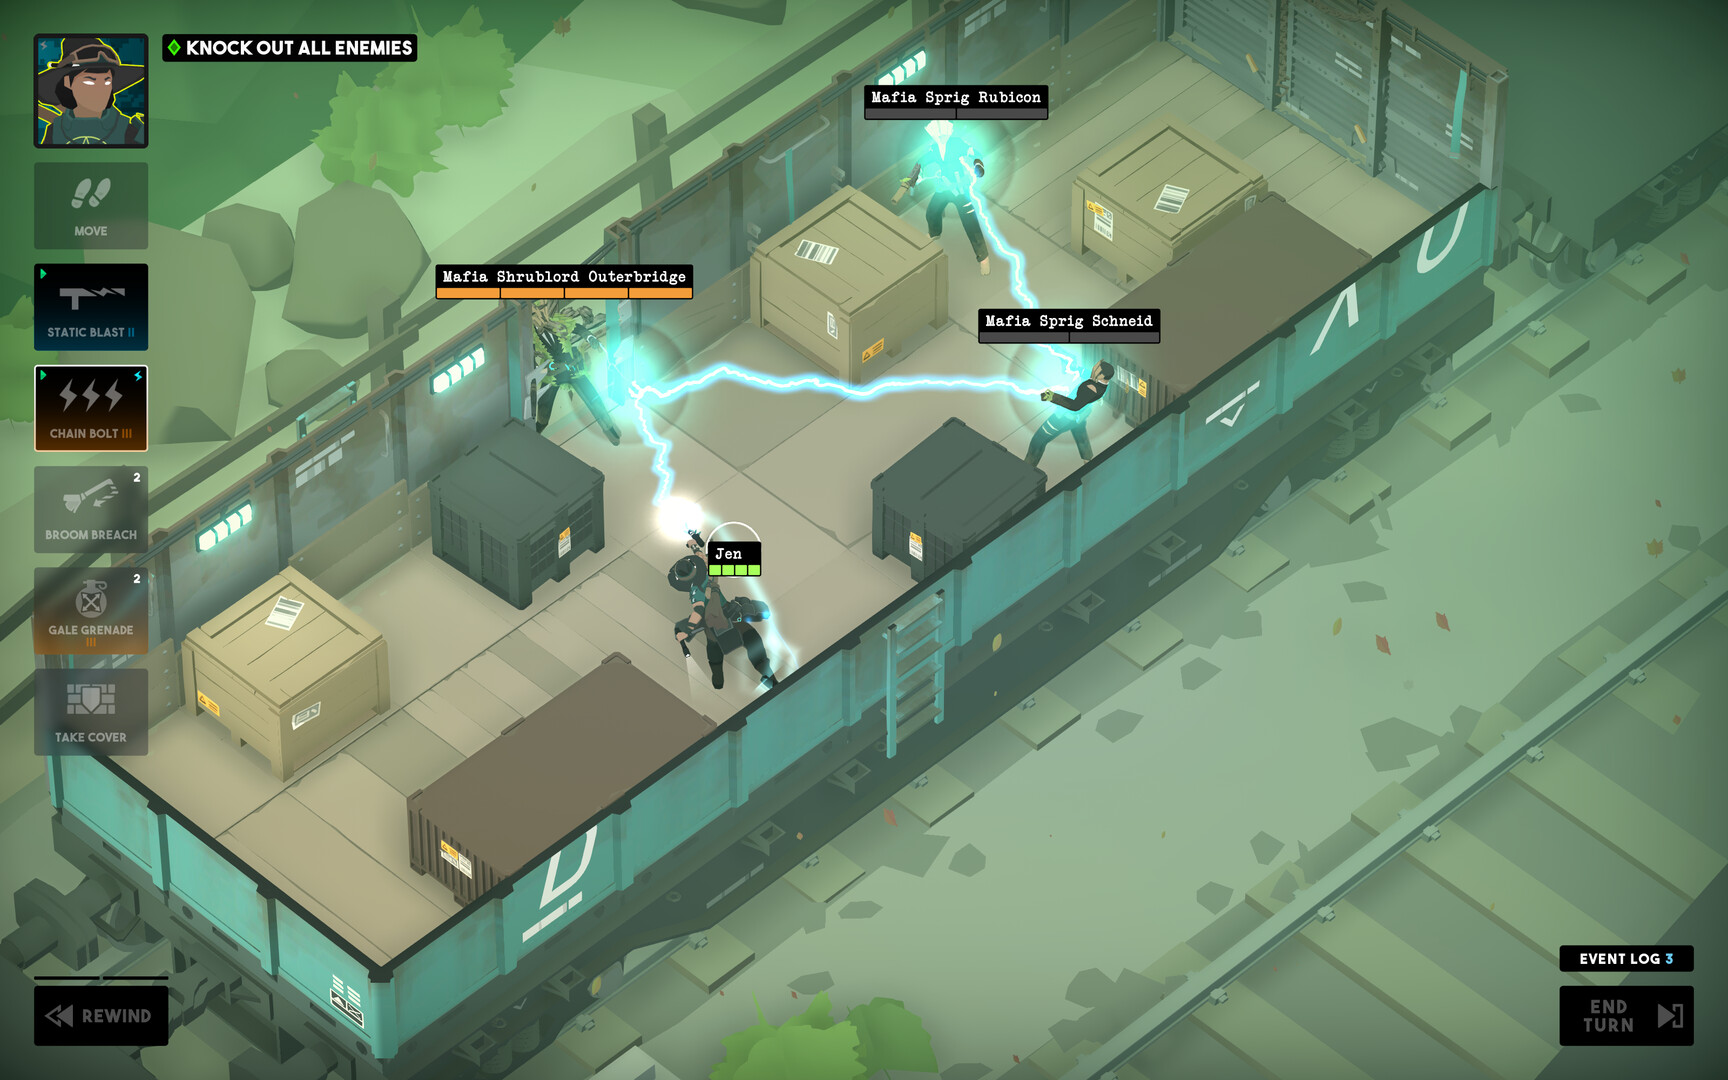
- Ability Synergy Is Hidden. The game tells you what each spell does, but it never explains how they interact. For example, throwing a Static Charge on a Wet enemy doesn’t just do extra damage — it creates a 3-tile chain lightning that hits everyone in that row. I discovered this by accident when my whole squad got wiped by my own combo. The game doesn’t teach you this.
- The Breach Phase Feels Wrong. When you breach a door, time slows down and you get a free action. New players (me, for hours) waste this on a single shot. No. The breach phase is your setup window. You should be tossing buffs, repositioning your squad, and stacking debuffs. One shot is almost never the optimal play.
- Vision Lines Are Weird. The game uses a pseudo-3D isometric view, but line of sight is calculated from the center of each tile. What looks like cover on screen might actually leave your character exposed. I took screenshots to prove it to myself — the visual and the mechanic disagree sometimes. Learn to trust the red indicator, not your eyes.
- The Second Boss Is a Wall. Everyone hits this. The Cyber Warden fight in mission 6 has a 4-turn limit, adds that spawn every turn, and an attack that hits your whole team. It’s the first real test of whether you understand the game’s systems. I beat it by sacrificing one character (let her die) to buy two turns of breathing room. Sometimes the win condition isn’t “everyone survives.”
The common thread here is that the game punishes you for playing it like a standard turn-based tactics game. You have to think in chains, not individual actions. Every move should set up the next two moves. If you’re treating each turn as a separate problem, you’re going to struggle every single mission.
Getting Started — What You Actually Need to Know Day One
Alright, let’s get specific. You just bought the game, you’ve done the tutorial, and you’re staring at the mission select screen. Here’s your to-do list before you click anything:
First, rebind your controls. The default keybinds are terrible. The game puts your primary ability on Q and secondary on E, but the spacebar is zoom and tab is overwatch. I swapped primary to left click (it’s not bound by default, which is insane) and put movement on right click. Set a hotkey for Toggle Grid Overlay — I use G because the default is hidden in a menu. You’ll thank me when you’re trying to figure out why your sniper can’t see that enemy through a crack.
Second, never use the auto-assign gear. The game tries to outfit your squad automatically, and it always picks the wrong stuff. The AI puts a Shotgun on your support character because it has high base damage, ignoring that the support needs the Flashbang Launcher to set up kills for your assault. Strip everyone, read each weapon’s secondary effect (look at the tiny text under the damage), and build around that. The Stun Baton on a melee character isn’t just a weapon — it’s a turn delay tool. Hitting an enemy with it pushes their next action back by 1 initiative tick. That’s huge.
Third, save your first skill point. You get one upgrade point after the tutorial mission. Do not spend it yet. Play the first two missions with the default loadout and see which playstyle clicks with you. I wasted my first point on a passive heal aura that sounded good on paper but actually only healed 2 HP per turn, which is meaningless when enemies hit for 15-20. By mission 3, you’ll know which character you love using, and you can invest in their Tier 2 ability. The right upgrade makes a character go from “meh” to “this is my carry.” The wrong one leaves you underpowered for hours.
Fourth, learn the initiative system. The turn order isn’t random. Every character and enemy has an initiative stat (shown as a number on their portrait). Higher number = they act first. But here’s the secret — abilities and weapons can shift initiative. The Sniper Rifle has a “slow” property: using it drops your initiative by 5 for the next turn. The Machine Pistol is “fast”: it boosts your next turn by 3. You can deliberately chain fast actions to double-turn an enemy. I beat one of the hardest encounters by making my tank so fast she acted twice before the boss moved once. It’s not a bug; it’s the core combat loop.
Expert Tips & Tricks — Stuff You Won’t Find in a Guide
These are the techniques that separate someone who completes the game on Normal from someone who beats it on Hard without losing a single operative. These came from hundreds of deaths and some truly stupid experiments.
Tip 1: The Triple Stack. Most abilities have status effects that last for a set number of turns. The game doesn’t tell you that stacking the SAME status effect on one enemy refreshes the duration but doesn’t increase intensity. However, stacking DIFFERENT effects that do the same thing (like two different types of “slow”) will stack. I ran a squad with two different slows — one from a Cyro Grenade and one from a Taser Dart. One enemy was moving at 20% speed for four turns. It couldn’t reach any of my guys. The boss just stood there while I plinked it down. Use different sources of the same debuff to lock down threats completely.
Tip 2: The Breach Positioning Trick. When you breach a door, your character enters the room at a specific tile — usually the one directly in front of the door. But you can aim your breach by clicking the edge of your character’s model during the breach phase. If you hold Shift and click a tile 2-3 spaces away from the door, your character will leap to that tile instead of stepping through. This lets you breach into cover behind a crate or directly into a flanking position. I used this to breach into the back corner of a room, completely behind the enemies’ overwatch lines. They spent their turn turning around while I shot them in the back.
Tip 3: The Sacrifice Play. Sometimes, the optimal move is to let a character get “downed” (not dead — just unconscious). A downed character can be revived with a medkit or Revive ability, but enemies will ignore them while they’re down. I had a mission where my assault operative had a Suicide Bomb vest (a rare item drop that explodes on death for 80 damage in a 3-tile radius). I deliberately ran her into the middle of the enemy group, let them kill her, and the explosion wiped out five enemies. The game counted it as a win, she was revived post-mission, and I got bonus experience for “tactical creativity.” Don’t be afraid to trade a temporary loss for a permanent gain.
Tip 4: The Overwatch Filter. You know how enemies have overwatch symbols? The game tells you which direction they’re watching. But the specific tile under the symbol tells you their range. If the symbol has a number (like “3”), that’s the maximum tiles away they can shoot. A symbol with no number means they can shoot any tile in their line of sight. Use this to find “dead zones” — tiles that are within their cone but outside their range. I cleared a hallway by standing exactly 4 tiles away from a guard whose overwatch range was 3. He couldn’t fire. Felt like cheating. It’s not — it’s using the information the game gives you.
Tip 5: The Item Recycling Loop. This is borderline exploitative, but it’s in the game and not patched out. You can sell items to the shop and then buy back the same items at a lower price if you wait 1 mission. No, seriously. If you sell a rare weapon for 200 gold, it might cost you only 150 to buy it back next mission. I don’t know if this is intentional or a bug, but I used it to cycle through different loadouts without losing value. You can treat the shop like a free rental service. Don’t hoard items — sell everything you’re not using and buy it back later at a discount.
This mechanic is similar to the resource management in XCOM 2, where liquidating unused gear is critical. But here, the buyback discount makes it even more forgiving. Take advantage of it early.
Common Mistakes to Avoid — I Made All of These
Listen, I’m not going to pretend I’m some god gamer who figured everything out on the first try. I made stupid mistakes, repeatedly. Here are the five that cost me the most progress, so you can laugh at my stupidity and then avoid it.
- Ignoring the Recon Drone. In the first three missions, you get a Recon Drone gadget. I ignored it because I thought “why waste a gadget slot on something that doesn’t kill?” Because it reveals the entire map and marks all enemies for 3 turns. Marked enemies take 20% more damage. That’s a massive damage multiplier that stacks with other buffs. I went 50 hours without using it once. Once I started bringing it on every mission, my kill count doubled. The drone also reveals hidden loot caches that aren’t visible otherwise. There’s a legendary sniper rifle that only spawns if you drone-scan a specific room in mission 4. I missed it my entire first playthrough.
- Standing Still After Breaching. The breach phase gives your character a movement buff for the first turn — they can move twice as far. I used to breach, shoot, and end turn. The enemy would immediately flank me and kill me. Now I breach, shoot, and then move my character to a new position, preferably behind full cover. The game even has a “reposition” prompt that flashes if you don’t move, but I ignored it for hours. The breach phase is a setup and retreat tool, not an assault tool.
- Over-specializing One Character. I had a sniper build with all her skill points in damage. She could one-shot anyone. But the mission in the Chemical Plant required my squad to stay in a gas cloud for three turns. My sniper had zero defensive upgrades and took damage every tick. She went down on turn 2 and I spent the rest of the mission running from two enemies. Build all your characters with at least one defensive or utility ability. The game will throw situations that demand it, and you’ll have no way to adapt if you’re all glass cannons.
- Forgetting to Use Grenades. Grenades are consumable but they’re also craftable and cheap to buy. I hoarded them “for emergencies” and never used them. By the final mission, I had 47 grenades in my inventory. The final boss has a mechanic where you need to destroy three generators in one turn to stagger her. Each generator has 30 HP and resistances to normal weapons. Grenades ignore resistances. I got stuck for two hours, checked a forum, and someone said “just throw three grenades.” Beat her in one try. Use your consumables. They exist to be used.
- Not Reading Enemy Profiles. Every enemy type has a profile card you can view by clicking on them during your turn. It shows their resistances, weaknesses, and special abilities. The Shield Trooper has a weak spot on his back that does triple damage. The Medic Drone heals 25 HP per turn but takes double damage from fire. I never looked at these until I was 30 hours in. The game literally gives you a combat manual for every enemy, and I ignored it. Don’t be like me. Click on every enemy and read their card before engaging. It takes 3 seconds and it tells you exactly how to kill them.
For a deeper look at reading enemy behavior, check out our Into the Breach guide, which covers the same “read the enemy card” principle — that game punishes you even harder for ignoring intel.
FAQs I Wished the Game Answered
Q: Can I respec my skill points?
A: Yes, but not directly. There’s a Neural Resequencer item that drops from certain side missions. You can also buy one from the shop for 500 gold. It’s expensive, but worth it if you’ve made a bad choice. The game doesn’t tell you this item exists — I found it by accident. If you’re stuck and think your build is the problem, save up and buy the Resequencer. It resets all skill points for one character.
Q: How do I unlock the fourth squad slot?
A: You unlock it by completing the Underwater Base mission with no operatives going down. I know, that sounds hard. But the mission is designed to be easier if you take it slow — enemies have limited patrol routes and you can isolate them. It’s not a timed mission. Take 20 turns if you need to. The fourth slot makes the game significantly easier, so prioritize this.
Q: What’s the best weapon in the game?
A: Objectively, the Phantom Rifle. It’s a sniper that does 55 base damage, ignores shields, and has a 100% critical chance on the first shot of each combat. It drops from a rare side quest in the Abandoned Factory. But it’s not worth farming for — if you get it, great. If not, the Pulse Carbine (available from the shop from mission 5 onward) is almost as good and doesn’t require RNG.
Q: How do I deal with the hacking minigame?
A: The hacking minigame is a memory pattern puzzle — you have to match a sequence of 4-6 colors in the right order. The game doesn’t punish you for failing, it just locks you out for one turn. My trick: use screenshot (F12 on Steam, or Print Screen) to capture the pattern before you click. The timer only counts down while you’re actively clicking, so you can stare at the screenshot as long as you need. This single trick turned hacking from “skip it” into “free loot every time.”
Q: Is there a penalty for restarting a mission?
A: No. Zero. You can restart as many times as you want. You keep all your progress from that mission (XP, loot collected before restart) UNLESS you complete the mission and fail. Restarting early is always better than struggling for 30 minutes and then failing anyway. I restart every time I lose a character, because the game tracks “number of deaths” for your final score. No shame in restarting. It’s how you learn the room layouts and enemy spawns.
Sign in to post a comment.
Sign in with GitHub to join the discussion.
💬 Comments
What players are saying:
Wait, the Recon Drone gives a damage buff? I've beaten the game twice and never knew that. The bit about cancelling breaches with ESC just saved me 20 minutes of frustration on the power plant mission. This guide is the first one that actually tells you the hidden stuff instead of just listing abilities. Thank you.
I gotta disagree about the Phantom Rifle being best. The damage is there, sure, but it's slow and the reload animation is longer than most other snipers. I'll take a Pulse Carbine with a +fire rate mod over it any day. But you're 100% right about the sacrifice play — I used a suicide bomb vest on the Sector 7 boss and it trivialized the fight. Great write up.
Three things from this guide that changed my entire run: 1) moving after breach (I always just stood there like an idiot), 2) the buyback discount at the shop (that's insane and I'm using it immediately), 3) the triple stack slow. The Cyber Warden boss went from impossible to "oh, you just stand there and die" mentality. This is the kind of advice I'd expect from a buddy over Discord, not a blog. Keep killing it.