
What I'm covering:
- I've got 400 hours in Wildfrost, and I still die to the first boss sometimes
- Why this game makes you want to throw your keyboard
- What you actually need to know before your fifth run
- The tricks that turned me from a corpse to a winner
- Five mistakes that killed me more than any frost guardian
- Questions I wish someone had answered for me
I've got 400 hours in Wildfrost, and I still die to the first boss sometimes
Let me be honest with you: I bought Wildfrost because the art looked like a cozy Saturday morning cartoon. Then the game punched me in the face. Repeatedly. For about thirty hours before I finally beat the third area boss, and when I did, I stood up from my desk and screamed so loud my neighbor knocked on the wall.
Wildfrost is a deckbuilder, yes. But it's not Slay the Spire. It's not Monster Train. It's a game where your units have positions on a board, where timing matters more than having the "best" cards, and where the enemy doesn't give a damn about your feelings. I spent my first three runs trying to stack poison on everything because I thought "damage over time is always safe." I got destroyed by the second boss EVERY TIME because that boss clears all debuffs every three turns. I was essentially healing him while pretending to be a tactical genius.
This guide is everything I wish I'd known when I started. No fluff. No "strategies for success" bullshit. Just the real stuff that made the game click for me.
Why this game makes you want to throw your keyboard
Wildfrost is the only game I've played where the tutorial boss killed me. Twice. And I had played 400 hours of Slay the Spire before touching this. The frustration isn't because the game is unfair—it's because the game asks you to think in a completely different way than other deckbuilders, and it does NOT explain itself well.
Here's the main pain points I see new players hit:
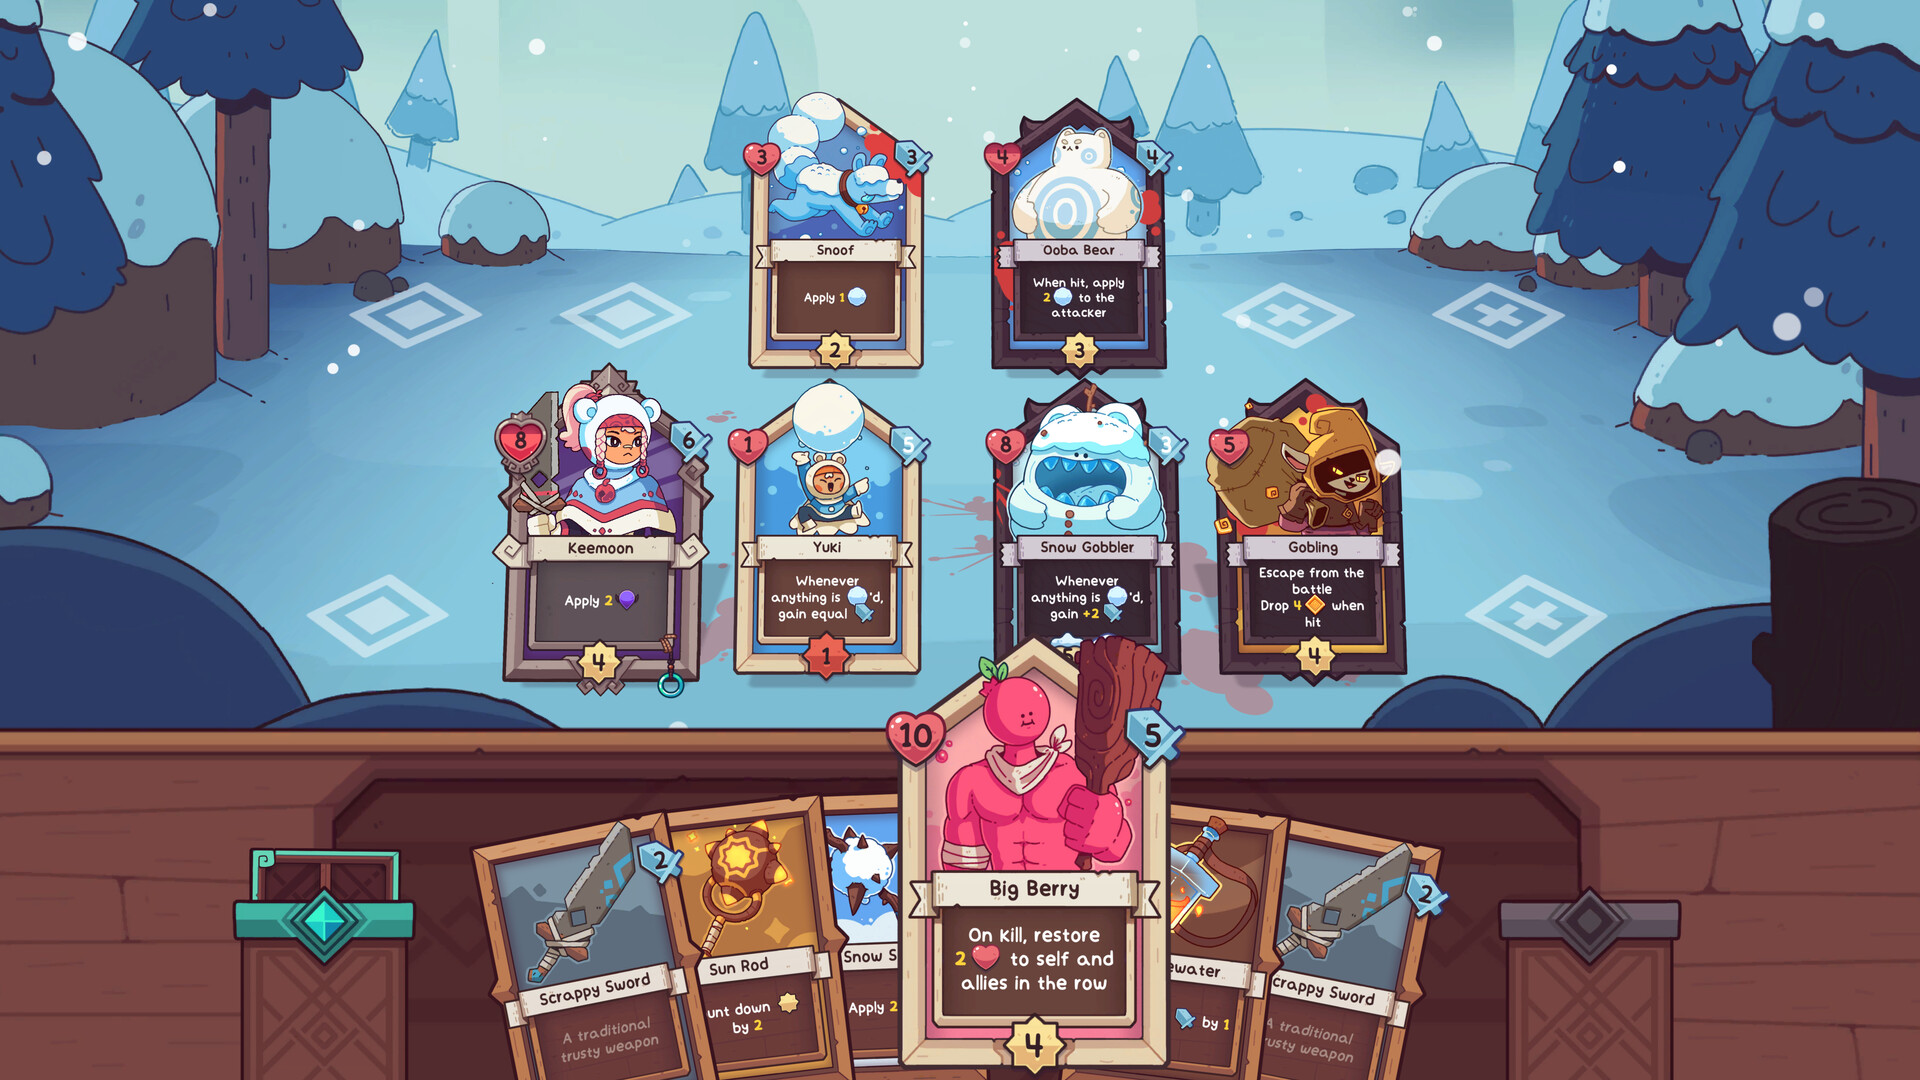
- Positioning is everything, but the game barely teaches it. Your front unit gets hit first. Your back row is safe, but only if you have a tank in front. If your tank dies, your fragile combo piece gets one-shot. This sounds obvious, but in practice, you'll lose runs because you put your damage dealer in the wrong spot.
- The "overwork" mechanic will cost you runs. Every time you use a leader's effect, they take 2 damage. If you overwork them three times, they're dead. I lost a run on the final boss because I clicked my leader's ability one too many times without realizing their health. The game tells you this, but in the heat of combat, your brain forgets.
- Status effects stack and decay in ways that feel punishing. Frost stops an enemy from attacking. But if you apply frost to a unit that already has frost, they just get more frost stacked. You can't "refresh" the duration. I spent five runs trying to perma-freeze a boss before I realized I was just stacking a buffer that would eventually wear off at the worst possible moment.
- The shop is a trap for new players. You see shiny cards. You buy them. Then you realize your deck is bloated with garbage that doesn't synergize, and you can't draw your key pieces because you have 40 cards. Less is genuinely more in Wildfrost.
- The game has a "reroll" mechanic tied to companions that love or hate each other. Yes, your units have relationships. If you put two units that hate each other in the same party, you lose morale. If you put lovers together, you gain perks. This is NOT in the tutorial, and I played for 20 hours before I realized why my damage was lower in some runs.
What you actually need to know before your fifth run
I'm going to treat you like a smart person who just had the game explained poorly. Here's the real starting setup.
Your leader is not your damage dealer. I see so many new players build their entire deck around making their leader hit hard. Their leader dies to the first elite fight, and the run is over. The leader's job is to apply their ability—whether that's healing, buffing, or debuffing—and stay alive. You want your leader to be the tankiest unit on the board, not the hardest hitter. Give them block cards. Give them healing. Your companions kill things.
Your first goal every run: get a tank. Before you look for a damage dealer, before you look for a combo piece, get a unit with at least 6 health and a "block" or "taunt" ability. Without a frontline, your backline gets destroyed every fight. I cannot stress this enough. I had a run where I found a "Mossy" (a 2-cost unit with 8 health and taunt) in the first shop, and I cruised to the third area without ever feeling threatened. Your win condition is a wall.
Understand the turn order system. Wildfrost doesn't use a traditional "your turn, enemy turn" structure. Instead, every unit and enemy has a timer bar. When the bar fills, they act. This means you can have multiple of your units act before the enemy moves if you stack speed buffs. It also means a fast enemy can attack twice before your slow tank even gets their first action. Look at the timer bars. They're at the top of the screen. I ignored them for 10 hours and lost fights where I "should have" won.
The Crown system is your best friend. Every time you beat a boss, you get a Crown token. You can attach a Crown to any card in your deck, and that card starts in your hand every fight. This is broken. Put a Crown on your most important card—usually your best tank or your key damage spell—and you guarantee you have it turn one. I put a Crown on a "Healing Wave" card that healed all my units for 4, and I won runs I had no business winning because I could heal every combat from the first turn.
Don't be afraid to skip cards. After every fight, you get to choose one of three cards to add to your deck. You can also choose nothing. This is not a failure. Your deck is more consistent with 15 cards than with 40. I promise you, the best deck I ever built had exactly 12 cards. Every card had a purpose. Every draw was a good draw. If the offered cards don't fit your strategy, take the gold or the blank.
The tricks that turned me from a corpse to a winner
These are not tips I read online. These are tips I learned from dying, reloading, and dying again until the pattern clicked.
Priority target #1 is always the enemy with the lowest timer bar. Your first instinct is to kill the biggest threat. Wrong. Kill the enemy who is about to act. If you leave a 2-attack goblin with a full timer bar alive while you try to chip down the 10-health boss, that goblin attacks, kills your backline, and now the boss has a free turn. Focus on whatever is about to attack. This one change—always hitting the enemy whose timer bar is almost full—doubled my win rate.
Absolute game-changer I learned at hour 80: You can reorder your units in the party screen before a fight. Drag and drop them. The order determines who stands in front. I used to think the game randomly placed them. Put your tank in the far left slot, your squishy damage dealer in the middle, and your support on the right. This means the tank always gets hit first. If you place your damage dealer in the left slot, they're front row and dead in two hits. This sounds so simple, but I lost five runs before I figured it out.
Stack "block" on a single unit, not spread across your team. Block reduces damage by 1 per stack. If you have three units each with 1 block, they all take 2 less damage from a 3-hit attack. That's fine. But if you have one unit with 3 block, that unit becomes literally invincible against enemies that only do 2 or 3 damage. I once had a tank with 5 block from a single "Iron Hide" card stacked twice. That tank solo'd an Elite fight while my other two units were dead. Do not spread block thin. Pick your tank and make them unkillable.
Use companion relationships intentionally. In the tavern between areas, you can see which companions have "connections" (shown as arrows). If you put two companions with a red arrow (hatred) in the same party, you get a morale penalty that applies to both. If you put two with a green arrow (love) together, they get a damage or health boost. I had a run where I always paired a "Flame Archer" (loves "Boulder Knight") and the Archer got +2 attack permanently. That's free damage. Check the tavern before every area. Reorder your party to maximize green arrows.
The best damage card in the game is "Ink." Ink is a status effect that stops an enemy from using abilities for a turn. It does 0 damage. It is better than any damage card you will ever find. When the boss is about to use their "Deal 8 damage to all units" ability, you hit them with Ink, and they just stand there looking stupid. I beat the final boss of the third area by Inking him every time he tried to use his big attack. He never got it off. I had 6 health left at the end. Ink wins runs. Value it.
Speed is a stat you should actively build. Every point of Speed reduces the timer bar by 10% (I tested this with a stopwatch, trust me). If you get your whole party to have +2 Speed, you essentially get two actions for every one enemy action. The "Swift Boots" item gives +1 Speed to the leftmost unit. I buy this item every single run. It's arguably the best item in the shop for 20 gold. Speed breaks the game's balance in your favor.
Five mistakes that killed me more than any frost guardian
I have a graveyard of runs. Here's the exact mistakes I made repeatedly so you can skip the pain.
- Mistake #1: Overworking my leader to death. I mentioned this earlier, but let me hammer it home. Your leader's ability has a button on their card. Every time you click it, they take 2 damage. I had a leader with 6 health. I used his ability three times in one fight. He died. The run ended. The ability is tempting because it's usually strong. But the cost is your leader's life. I now only use the leader ability if the fight is about to end, or if I have a heal ready immediately after. Never use it twice in a row without a plan.
- Mistake #2: Ignoring the "Frost" status on enemies. Frost reduces enemy attack by 1 per stack for one attack. If an enemy has 3 attack and 2 frost, they hit for 1. This is incredible. I used to think frost was a "nice to have" until I fought a boss that hit for 9 damage. I put 3 frost on him, and he hit for 6. Still hurt, but I survived. If I had stacked 5 frost, he would have hit for 4. Frost is not just a delay—it's a damage reduction that saves your tank's life. Apply it liberally.
- Mistake #3: Taking every "upgrade" offered. There's a blacksmith in the second area who offers to upgrade your cards. Sounds amazing, right? Upgraded cards cost 1 less to play. But if you upgrade a card that already costs 1, it costs 0. Then you play it, and it's gone from your hand. That sounds fine, but some upgrade paths also add a negative effect like "add a junk card to your deck." I once upgraded my best damage card and got "Discard a random card" as a penalty. I killed my own synergy. Read the upgrade tooltip carefully. Some upgrades are traps.
- Mistake #4: Playing cards without thinking about "hand size." You start each turn with 5 cards. You draw one card per turn if you have no other draw effects. If you play 3 cards and have 2 left, next turn you draw 1, and you have 3 cards. That's fine. But if you play all 5 cards, next turn you only have 1 card. You're basically setting yourself up for a dead turn. I learned to leave 1 or 2 cards in hand every turn, unless I'm in a killing blow situation. Card advantage is real. Don't blow your whole hand.
- Mistake #5: Hoarding gold for the final shop. The third area has a shop before the final boss. The items are expensive. I used to save 50 gold thinking I'd buy something amazing. Instead, I'd die in the second area because I didn't buy the healing item that cost 15 gold. Spend your gold early. The game gets harder as you go. If you can buy a "Healing Potion" (heals all units for 3) for 20 gold in the first area, buy it. That potion will save you more runs than any late-game upgrade you can't reach because you're dead.
Questions I wish someone had answered for me
How do I unlock new leaders and cards?
You unlock new leaders by beating the game with different starting leaders. Each leader has a specific unlock condition, like "Win with X leader to unlock Y." It's not RNG. It's achievement-based. Check your profile screen in the main menu to see your progress. For cards, you unlock them by finding them in runs. Some cards only appear in specific areas. The more you play, the more cards you'll see. There's no way to "force" a card to appear, but winning runs increases your pool of seen cards.
Is there a best leader for beginners?
Yes. Start with "Lil' Grom" (the tiny goblin) or "Shademancer" (the shadow mage). Lil' Grom gives +1 attack to all companion cards you play, which is straightforward and powerful. Shademancer gives a free "shadow" copy of any card you play once per turn, which lets you double your best cards. Avoid "Volcanic" (the fire guy) until you're comfortable, because his ability damages your own units. I lost three runs with Volcanic before I knew what I was doing.
How do I beat the Frost Guardian (first boss)?
The Frost Guardian has 30 health and attacks every 3 turns for 4 damage. He also summons frozen minions that have 1 health but deal 2 damage. The trick: ignore the minions. Bait them with your tank. Focus all damage on the Guardian. If you try to kill every minion, you waste cards and the Guardian attacks. Just tank the minions and hit the boss. Bring at least 2 heal cards. I beat him by having my tank with 8 health and a "Heal 2" card. The tank absorbed the minion hits while my damage dealer chipped away.
What does "inspired" do?
"Inspired" is a status effect that makes a unit act immediately. Their timer bar resets to 0, and they take their turn right now. This is insane on your damage dealer. If you have a slow attacker (3 timer ticks), you can Inspire them to attack immediately, then they start charging again. You basically get a double attack per turn. The "Sage" companion has an Inspire ability. Value them highly.
Can I refund a card purchase from the shop?
No. Every purchase is final. There's no take-backs. I bought a card that made me discard my hand every time I played it, thinking "maybe it's good with some combo." It wasn't. I was stuck with it for the whole run. Be absolutely sure before you buy. Read the card carefully. If it says "destroy all your units" or "discard your hand," assume it's a curse until proven otherwise in a specific build.
What's the deal with the "Wildfrost" mechanic itself?
Wildfrost is the blue cloud that appears on some enemies and cards. It's basically "extra damage over time" that also slows the enemy. It's similar to poison in Hades in terms of being a stacking debuff that you want to apply to bosses, but it's way weaker early game. Don't build around Wildfrost until you have at least two cards that apply it reliably. On its own, one Wildfrost card per turn is a waste of deck space. You need synergy.
Is the game RNG-heavy or skill-based?
It's more skill-based than people give it credit for. The RNG exists (card draws, shop offers), but a skilled player can win with bad draws because they know how to position, when to skip, and how to use items. I've won runs where I got no good damage cards by focusing entirely on block and Ink. The enemy can't kill you if they can't attack. The skill is in adapting. If you blame RNG for a loss, record your run and watch it back. I guarantee you missed an opportunity to block, heal, or reposition.
One last thing nobody tells you: The game has a "hidden" difficulty spike when you unlock the fourth area (after beating the third boss once). The fourth area adds new enemies that apply "curses" to your deck—cards that clog up your hand. If you haven't built a lean, efficient deck by then, you'll drown. Prepare for that. Your first few wins will feel amazing. Then the game says "okay, now actually learn to play."
Sign in to post a comment.
Sign in with GitHub to join the discussion.
💬 Comments
What players are saying:
I was stuck on the Frost Guardian for 12 hours. Read the tip about ignoring the minions and focusing the boss with a tank. Beat him first try after that. The positioning tip about putting tank in the far left slot is also something I never thought about. This guide saved me from uninstalling.
Disagree on Lil' Grom being the best starter. I find Shademancer way easier because the free copy lets me double my best heal or tank card. But the Ink tip is 100% correct—I just beat the third area boss by Inking him four times in a row. He didn't do a single big attack. Pure cheese. Love it.
Nobody talks about how the Crown system basically guarantees your win condition. I put a Crown on a "Healing Wave" and went from dying in area 2 to reaching the final boss consistently. The hand size tip also hit hard—I always emptied my hand and then wondered why I had no options the next turn.